By: W09-4 Since: Jan 2019 Licence: MIT
1. Introduction
1.1. What is QuickDocs
QuickDocs is an all in one solution where doctors can have greater control in facilitating patient consultations, organizing appointments, and monitoring financial and inventory records in private clinics.
1.2. Purpose
The developer guide covers the software architecture, design decisions and implementation details of the features in QuickDocs.
1.3. Audience
This document aims to provide guidance for both software developers and software testers working on QuickDocs.
1.4. How to use the Developer Guide
Here are the notations used in the document:
| This is a tip. Useful information pertaining to the features will be written here. |
|
This is a note. Additional information that further explains a feature will be written here. |
| This is a warning. Special information that requires additional attention to be paid will be written here to prevent operational issues from happening. |
filepath, command and method are all formatted with a grey background. Example: help, getCurrentConsultation()
and logic\LogicManager
2. Setting up
2.1. Prerequisites
-
JDK
9or laterJDK 10on Windows will fail to run tests in headless mode due to a JavaFX bug. Windows developers are highly recommended to use JDK9. -
IntelliJ IDE
IntelliJ by default has Gradle and JavaFx plugins installed.
Do not disable them. If you have disabled them, go toFile>Settings>Pluginsto re-enable them.
2.2. Setting up the project in your computer
-
Fork this repo, and clone the fork to your computer
-
Open IntelliJ (if you are not in the welcome screen, click
File>Close Projectto close the existing project dialog first) -
Set up the correct JDK version for Gradle
-
Click
Configure>Project Defaults>Project Structure -
Click
New…and find the directory of the JDK
-
-
Click
Import Project -
Locate the
build.gradlefile and select it. ClickOK -
Click
Open as Project -
Click
OKto accept the default settings -
Open a console and run the command
gradlew processResources(Mac/Linux:./gradlew processResources). It should finish with theBUILD SUCCESSFULmessage.
This will generate all resources required by the application and tests.
2.3. Verifying the setup
-
Run the
w09.quickdocs.MainAppand try a few commands -
Run the tests to ensure they all pass.
2.4. Configurations to do before writing code
2.4.1. Configuring the coding style
This project follows oss-generic coding standards. IntelliJ’s default style is mostly compliant with ours but it uses a different import order from ours. To rectify,
-
Go to
File>Settings…(Windows/Linux), orIntelliJ IDEA>Preferences…(macOS) -
Select
Editor>Code Style>Java -
Click on the
Importstab to set the order-
For
Class count to use import with '*'andNames count to use static import with '*': Set to999to prevent IntelliJ from contracting the import statements -
For
Import Layout: The order isimport static all other imports,import java.*,import javax.*,import org.*,import com.*,import all other imports. Add a<blank line>between eachimport
-
Optionally, you can follow the UsingCheckstyle.adoc document to configure Intellij to check style-compliance as you write code.
2.4.2. Updating documentation to match your fork
After forking the repo, the documentation will still have the SE-EDU branding and refer to the se-edu/addressbook-level4 repo.
If you plan to develop this fork as a separate product (i.e. instead of contributing to se-edu/addressbook-level4), you should do the following:
-
Configure the site-wide documentation settings in
build.gradle, such as thesite-name, to suit your own project. -
Replace the URL in the attribute
repoURLinDeveloperGuide.adocandUserGuide.adocwith the URL of your fork.
2.4.3. Setting up CI
Set up Travis to perform Continuous Integration (CI) for your fork. See UsingTravis.adoc to learn how to set it up.
After setting up Travis, you can optionally set up coverage reporting for your team fork (see UsingCoveralls.adoc).
| Coverage reporting could be useful for a team repository that hosts the final version but it is not that useful for your personal fork. |
Optionally, you can set up AppVeyor as a second CI (see UsingAppVeyor.adoc).
| Having both Travis and AppVeyor ensures your App works on both Unix-based platforms and Windows-based platforms (Travis is Unix-based and AppVeyor is Windows-based) |
2.4.4. Getting started with coding
When you are ready to start coding,
-
Get some sense of the overall design by reading Section 3.1, “Architecture”.
-
Take a look at [GetStartedProgramming].
3. Design
3.1. Architecture
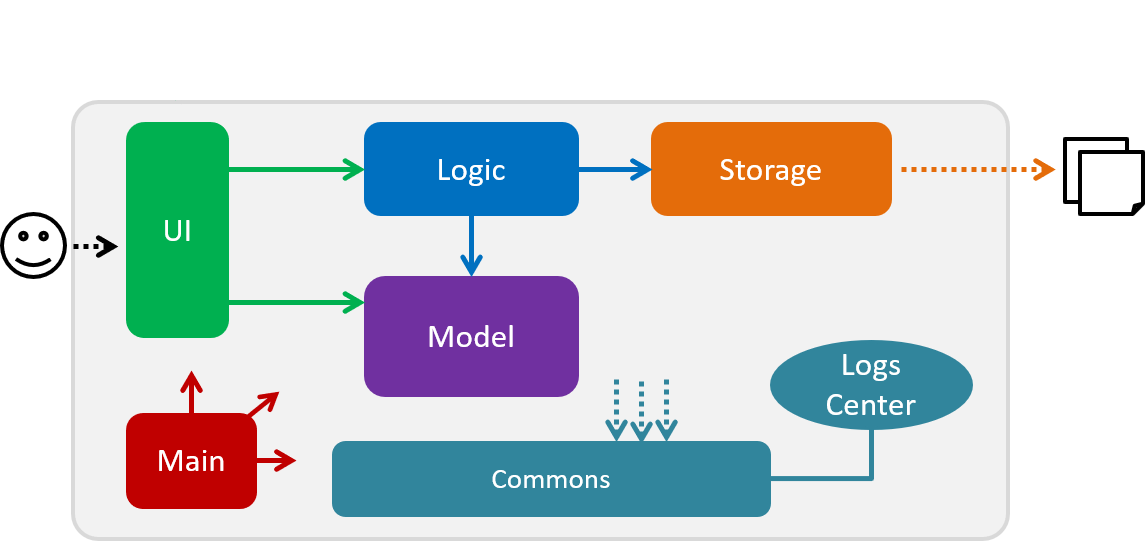
The Architecture Diagram given above explains the high-level design of the App. Given below is a quick overview of each component.
The .pptx files used to create diagrams in this document can be found in the diagrams folder. To update a diagram, modify the diagram in the pptx file, select the objects of the diagram, and choose Save as picture.
|
Main has only one class called MainApp. It is responsible for,
-
At app launch: Initializes the components in the correct sequence, and connects them up with each other.
-
At shut down: Shuts down the components and invokes cleanup method where necessary.
Commons represents a collection of classes used by multiple other components.
The following class plays an important role at the architecture level:
-
LogsCenter: Used by many classes to write log messages to the App’s log file.
The rest of the App consists of four components.
Each of the four components
-
Defines its API in an
interfacewith the same name as the Component. -
Exposes its functionality using a
{Component Name}Managerclass.
For example, the Logic component (see the class diagram given below) defines it’s API in the Logic.java interface and exposes its functionality using the LogicManager.java class.

How the architecture components interact with each other
The Sequence Diagram below shows how the components interact with each other for the scenario where the user issues the command padd … (values are not added for brevity).
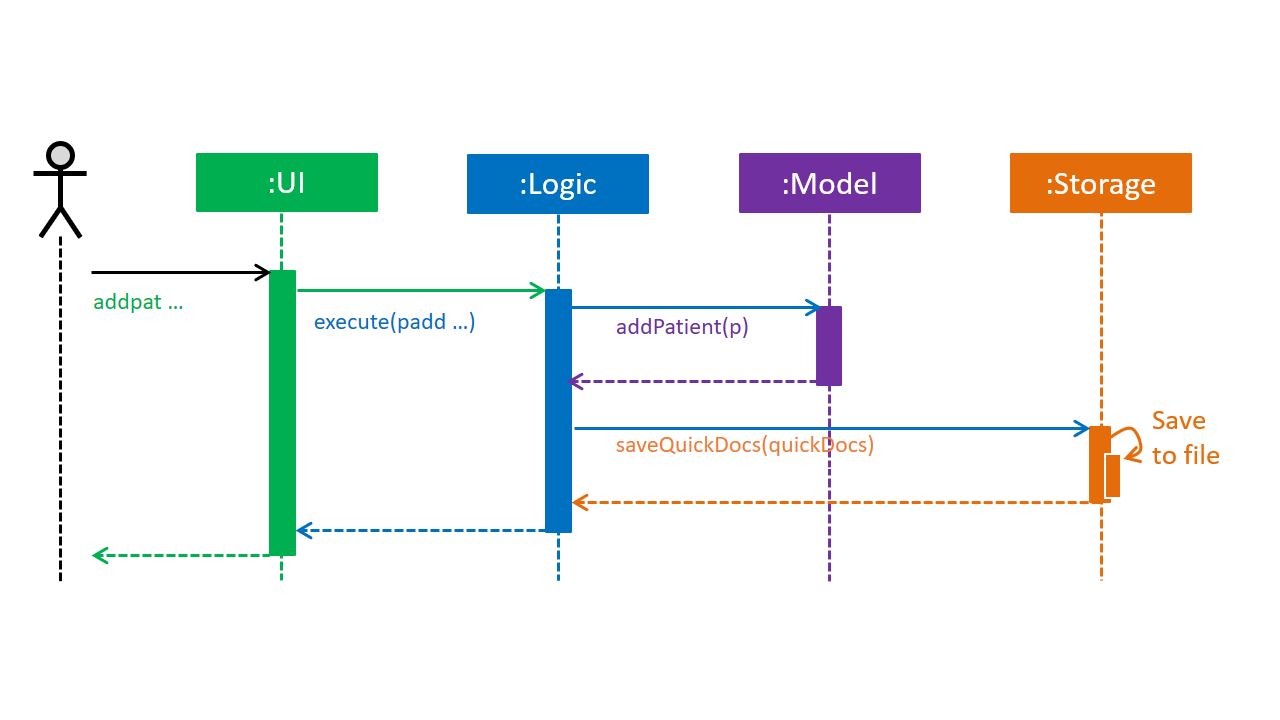
addpat … commandThe sections below give more details of each component.
3.2. UI component
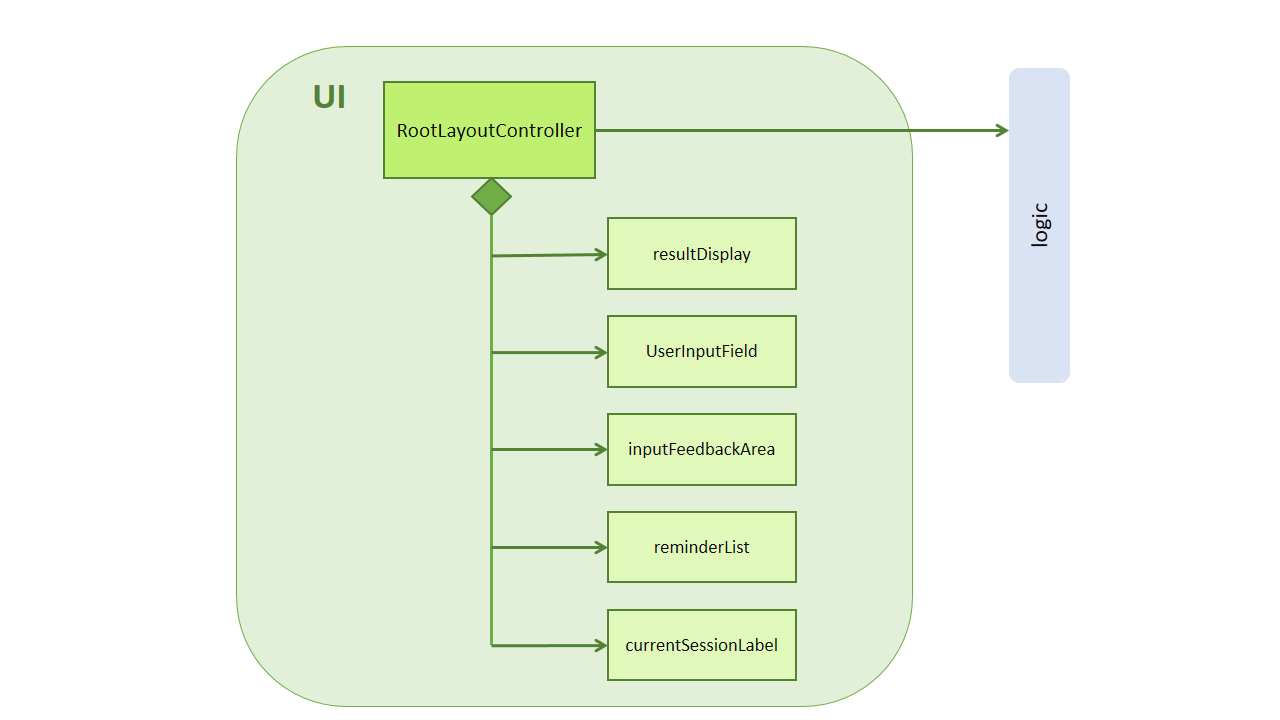
The UI aspect of QuickDocs is controlled by a single rootLayoutController that is responsible for handling the user interactions with
the interface. It is composed of the resultDisplay, userInputField, inputFeedbackArea, reminderListPanel and
the currentSessionLabel controls.
The UI component uses JavaFx UI framework. RootLayout is defined in the matching .fxml file that is in src/main/resources/view folder.
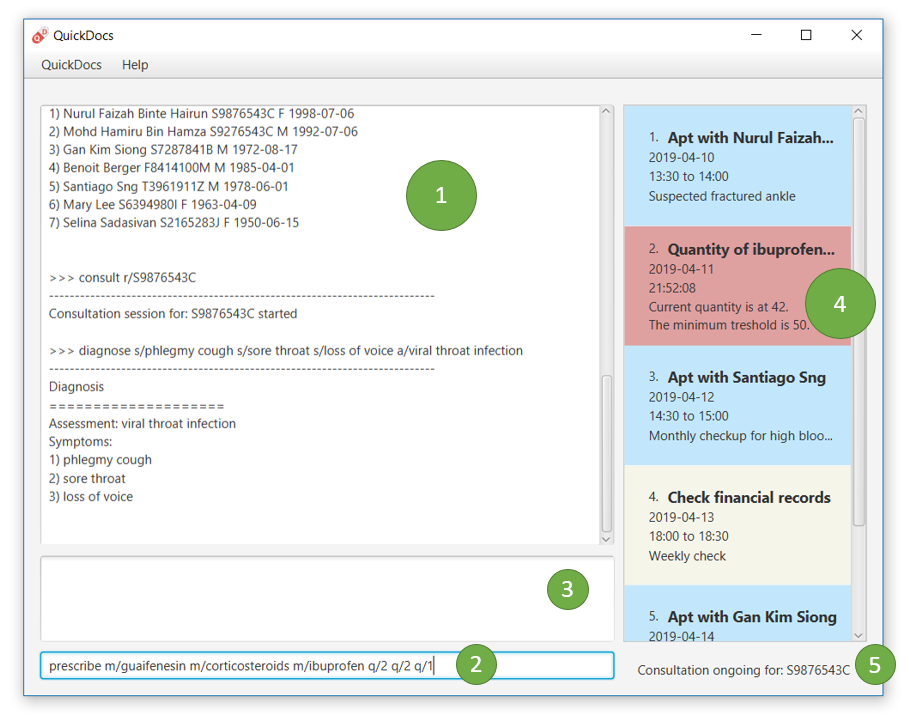
-
resultDisplaywill reflect the results of the command entered -
userInputFieldis where the user can enter their commands -
Should the command fail due to erroneous command input, instructions to rectify the command will be displayed on the
inputFeedbackArea -
Appointments and Reminders are displayed on the
ReminderListPanel. Appointments are coloured blue, medicine alarms are coloured red and other reminders are coloured beige. -
Current consultation sessions will be indicated on the
currentSessionLabel.
Since the commands entered by the user is done through the user interface, the UI component interacts with the
Logic specifically for the execution of commands. For details pertaining to the execution of commands, please refer to
the section on the logic component
The flow of how the interaction between the two components are as follows:
-
The user types the command line on the
userInputFieldand pressesEnter -
The command line is sent to the
logiccomponent for execution -
Any results or issues encountered during the process of execution will be returned from the
Logiccomponent to theUIcomponent -
UIwill reflect the results or issues faced on theresultDisplayand theinputFeedbackArearespectively
3.3. Logic component

API :
Logic.java
-
Logicuses theQuickDocsParserclass to parse the user command. -
This results in a
Commandobject which is executed by theLogicManager. -
The command execution can affect the
Model(e.g. adding a patient). -
The result of the command execution is encapsulated as a
CommandResultobject which is passed back to theUi. -
In addition, the
CommandResultobject can also instruct theUito perform certain actions, such as displaying help to the user.
Given below is the Sequence Diagram for interactions within the Logic component for the execute("statistics 012019") API call.
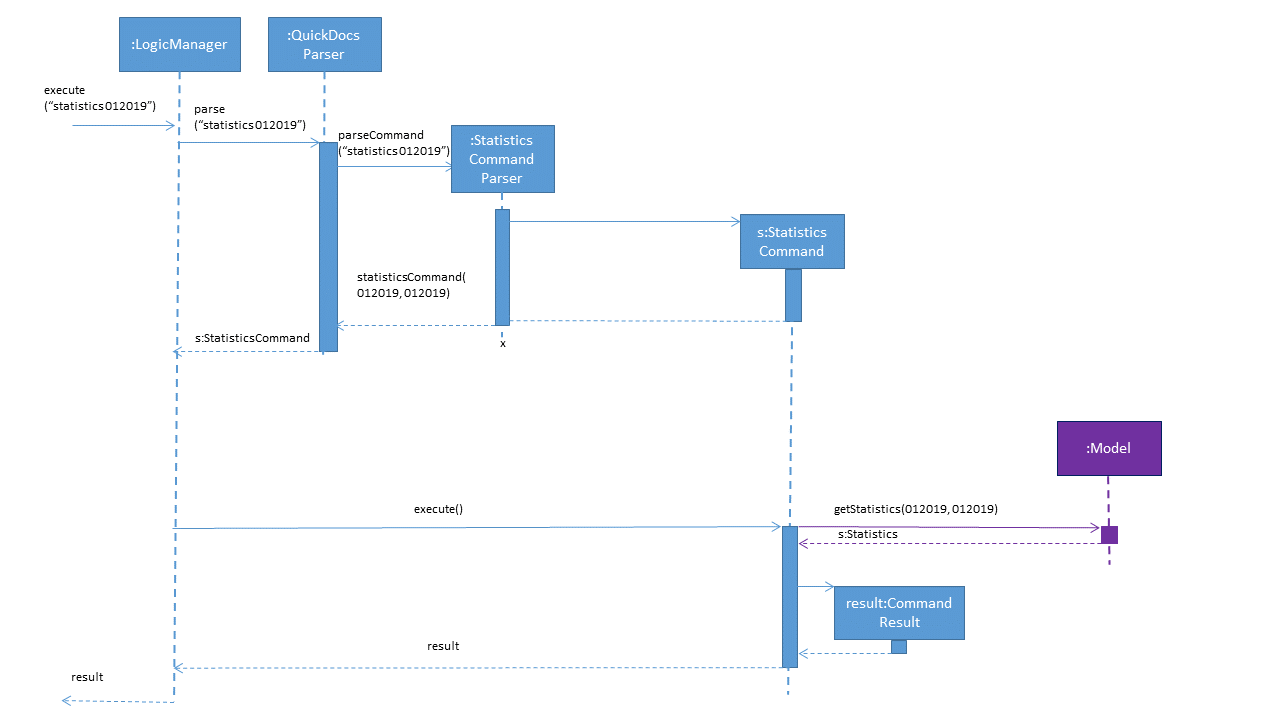
statistics 012019 Command3.4. Model component
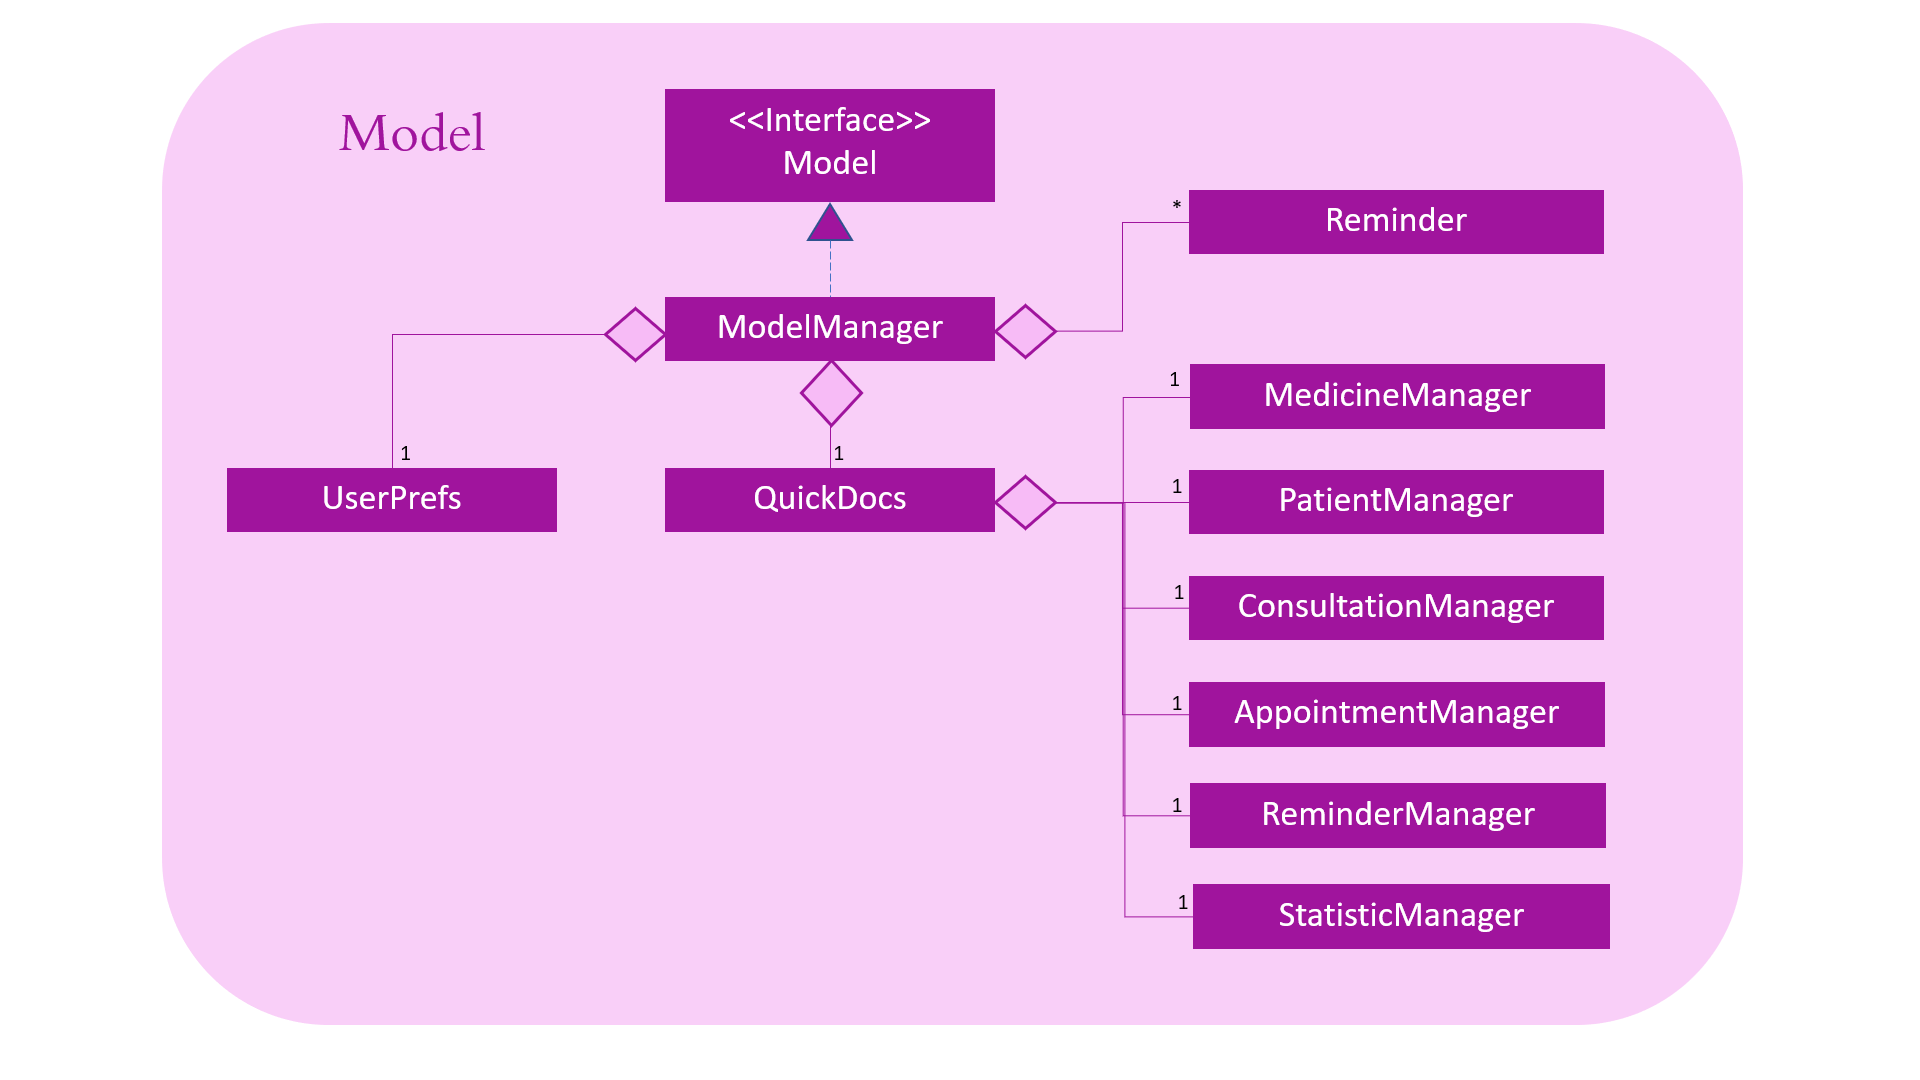
The figure below describes the architecture of the model component of this application.
API : Model.java
The Model,
-
stores a
UserPrefobject that represents the user’s preferences. -
consists of a QuickDocs object which contains all the data, and lists of managers of sub-modules retrieved from the QuickDocs object.
-
does not depend on any of the other three components.
The QuickDocs,
-
is the ultimate unit storing all sub-models and data for this application.
-
is the class in charge of interacting with the storage component responsible for converting application data to files for storage.
-
see Storage Component for detailed explanation of the role of
QuickDocsin Storage component.
The following sections illustrate the design of managers of each sub-module.
3.4.1. Model for Medicine module
QuickDocs supports customized organization of medicine inventory.
The figure below illustrates the implementation of the inventory system for medicine.
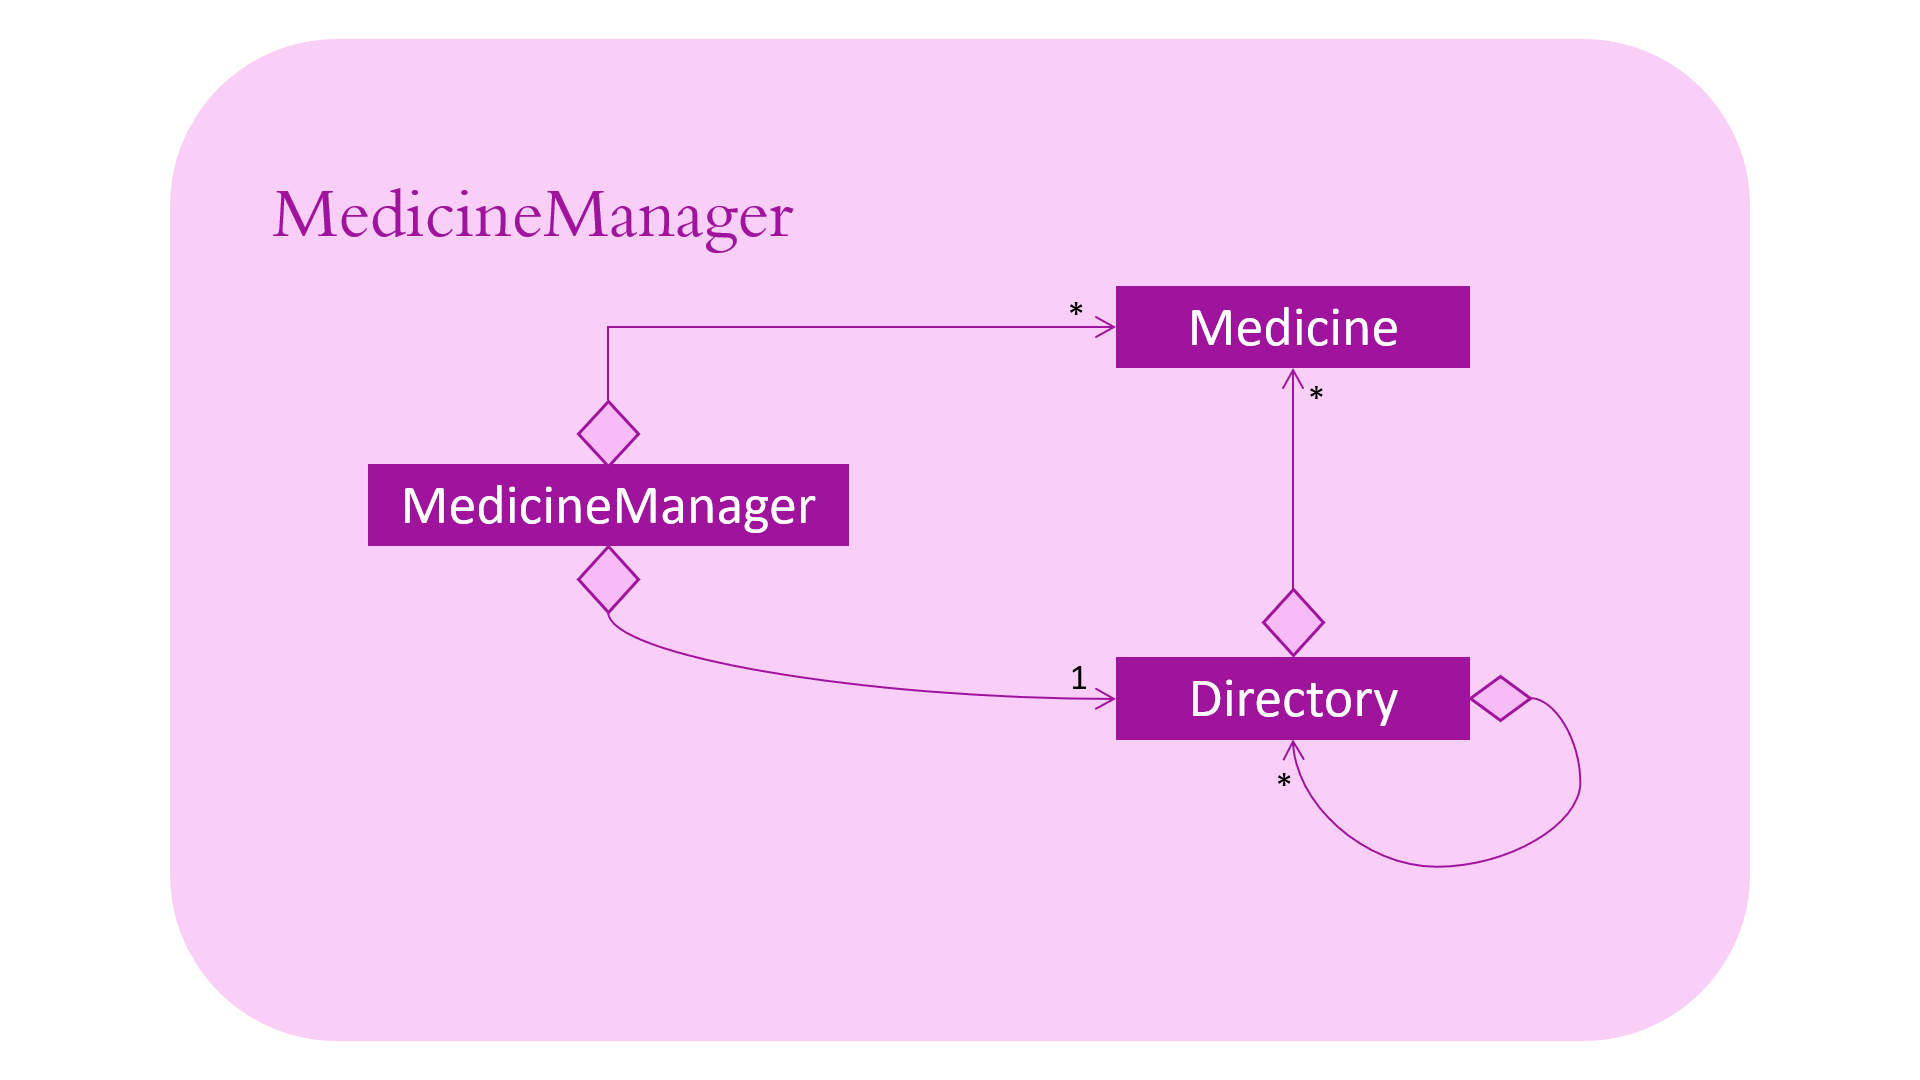
In medicine module, information about a medicine is encapsulated into the Medicine class.
Directory is a container for medicines, and sub-directories as well.
The MedicineManager keeps a list of reference of all unique medicines in the storage, so that no two medicine in the storage could share the same name to avoid confusion.
| All occurrences of medicines with the same name across different directories point to the same medicine in the list of unique medicine in MedicineManager. |
As the directory-medicine structure resembles the tree data structure, it is possible to support tree-like operations, such as setting the same threshold for the "subtree" of a directory.
3.4.2. Model for Patient Management
The figure below illustrates how is a patient represented and how are patients are stored in QuickDocs.
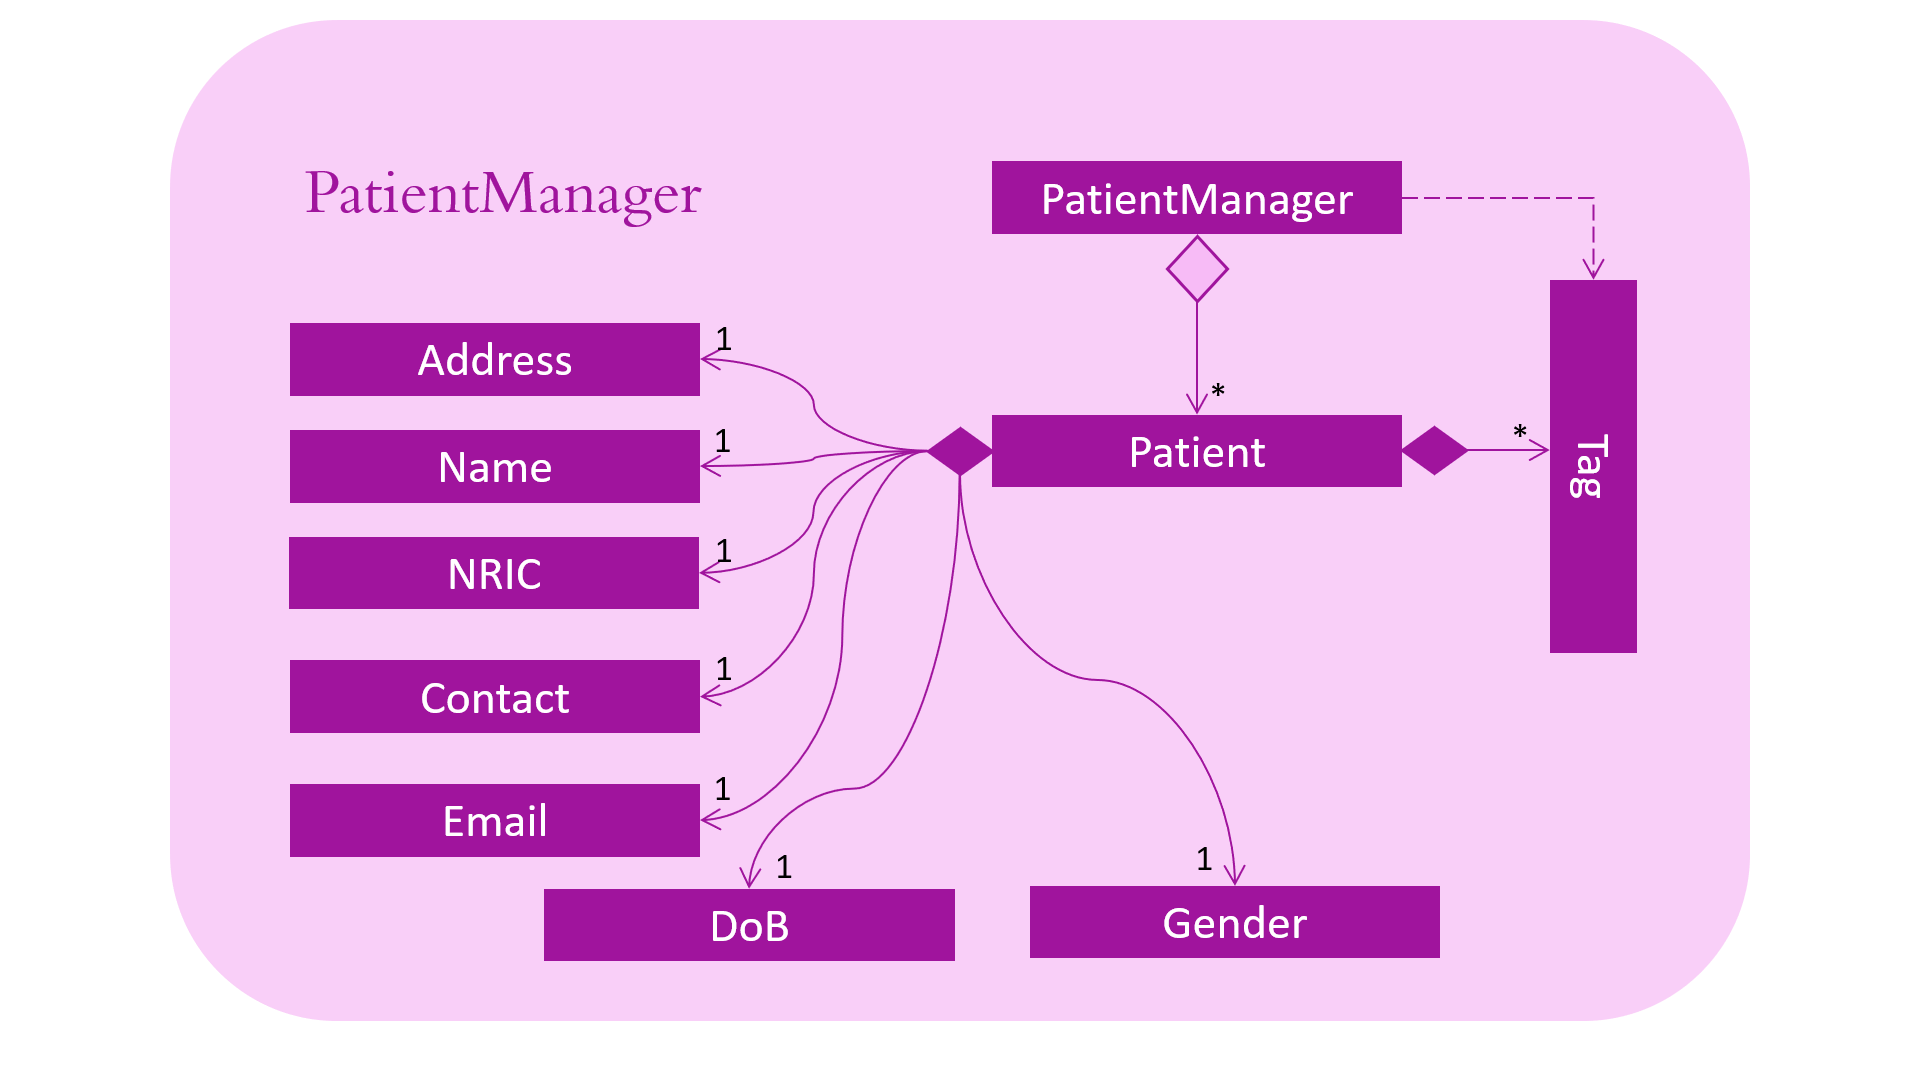
A patient in QuickDocs consists of an address, name, NRIC, Contact, Email, Date of Birth, Gender and any number of tags.
| Specially, no two patients in QuickDocs can share the same NRIC number. In other words, the patients in QuickDocs are easily identified with their unique NRIC numbers. |
The PatientManager keeps a list of patients by chronological order of addition. PatientManager supports searching patients by NRIC, name and tags.
3.4.3. Model for ConsultationManager
The figure below illustrates how consultations with patients are recorded and organized in QuickDocs.
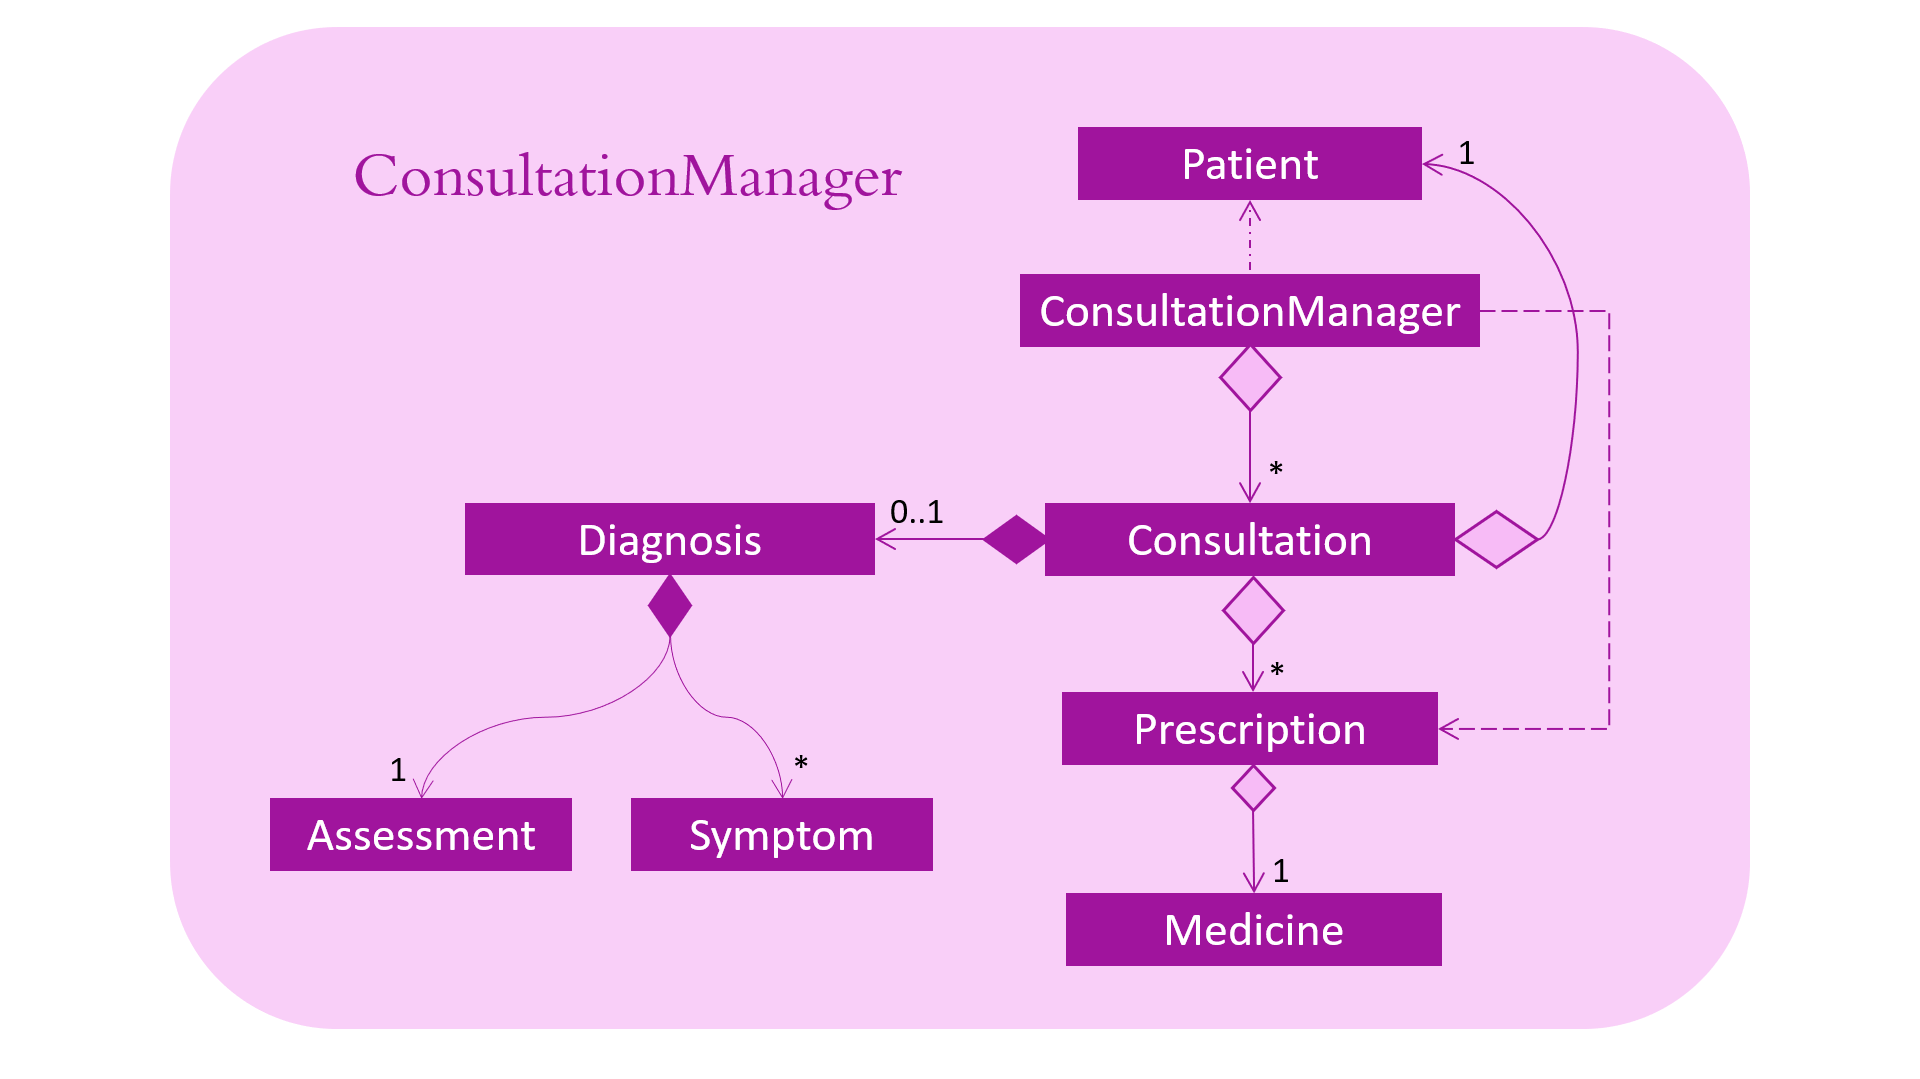
A Consultation in QuickDocs is defined to one patient and it consists of an optional Diagnosis and a list of Prescription of medicine.
A diagnosis is then consisting of an assessment, the final conclusion of patient’s illness, and a list of symptoms.
Past consultations are kept as a list in ConsultationManager, and the manager supports listing consultations of the same patient by his/her NRIC.
3.4.4. Model for StatisticsManager
Every monetary transaction happened in the clinic, such as prescriptions to patients, is recorded by QuickDocs, and statistics report could be generated upon user requests.
The figure below illustrates how such records are organized in QuickDocs, and how the statistics reports are generated.
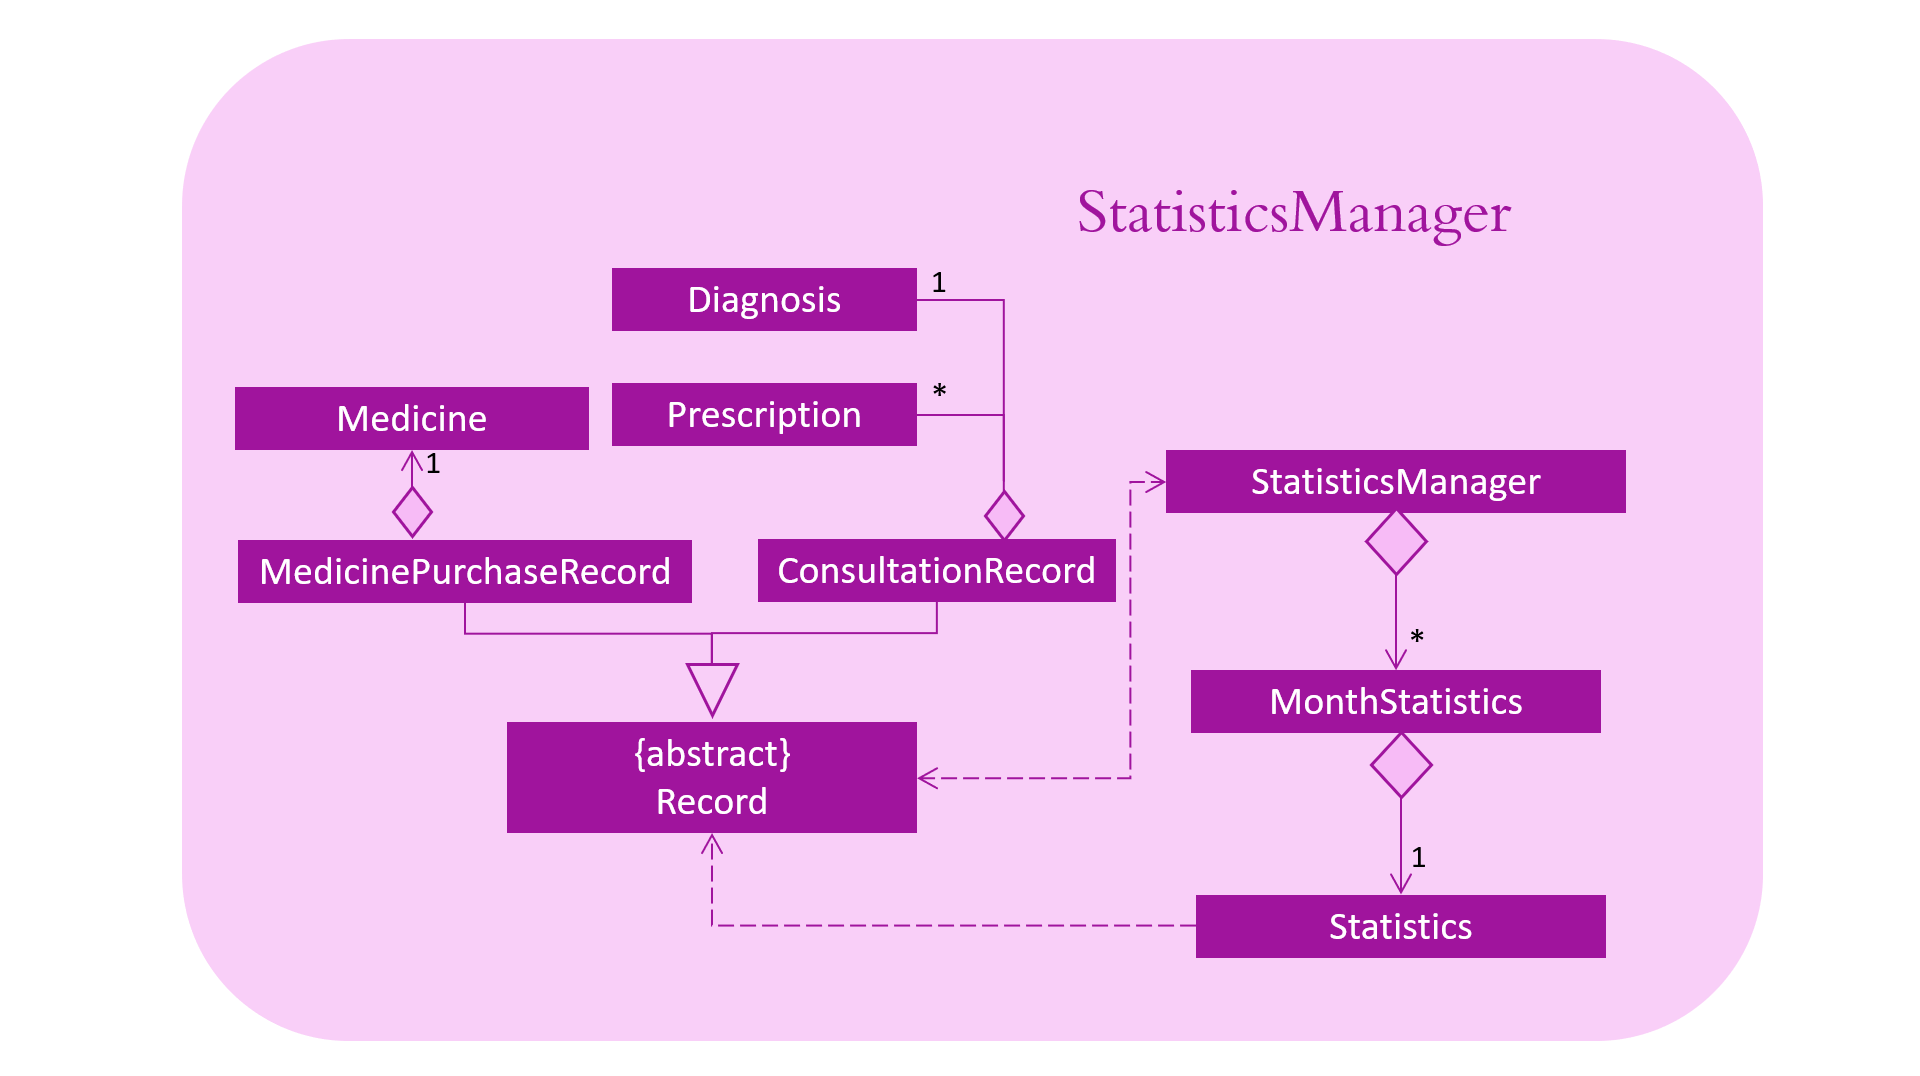
Monetary transactions in the clinics are categorized to two forms, i.e purchasing of medicine and revenue from consulting patients.
Both forms have corresponding classes to record such transactions. Every successful execution of purchase medicine command and every successful consultation will create its corresponding record.
MonthStatistics holds records of purchases of medicines and consultations happened in a particular month.
The overall StatisticsManager has a list of MonthStatistics arranged in chronological order.
3.4.5. Model for AppointmentManager
The Appointment module manages time slots for appointment requests from the patients.
The figure below illustrates how AppointmentManager is organized.
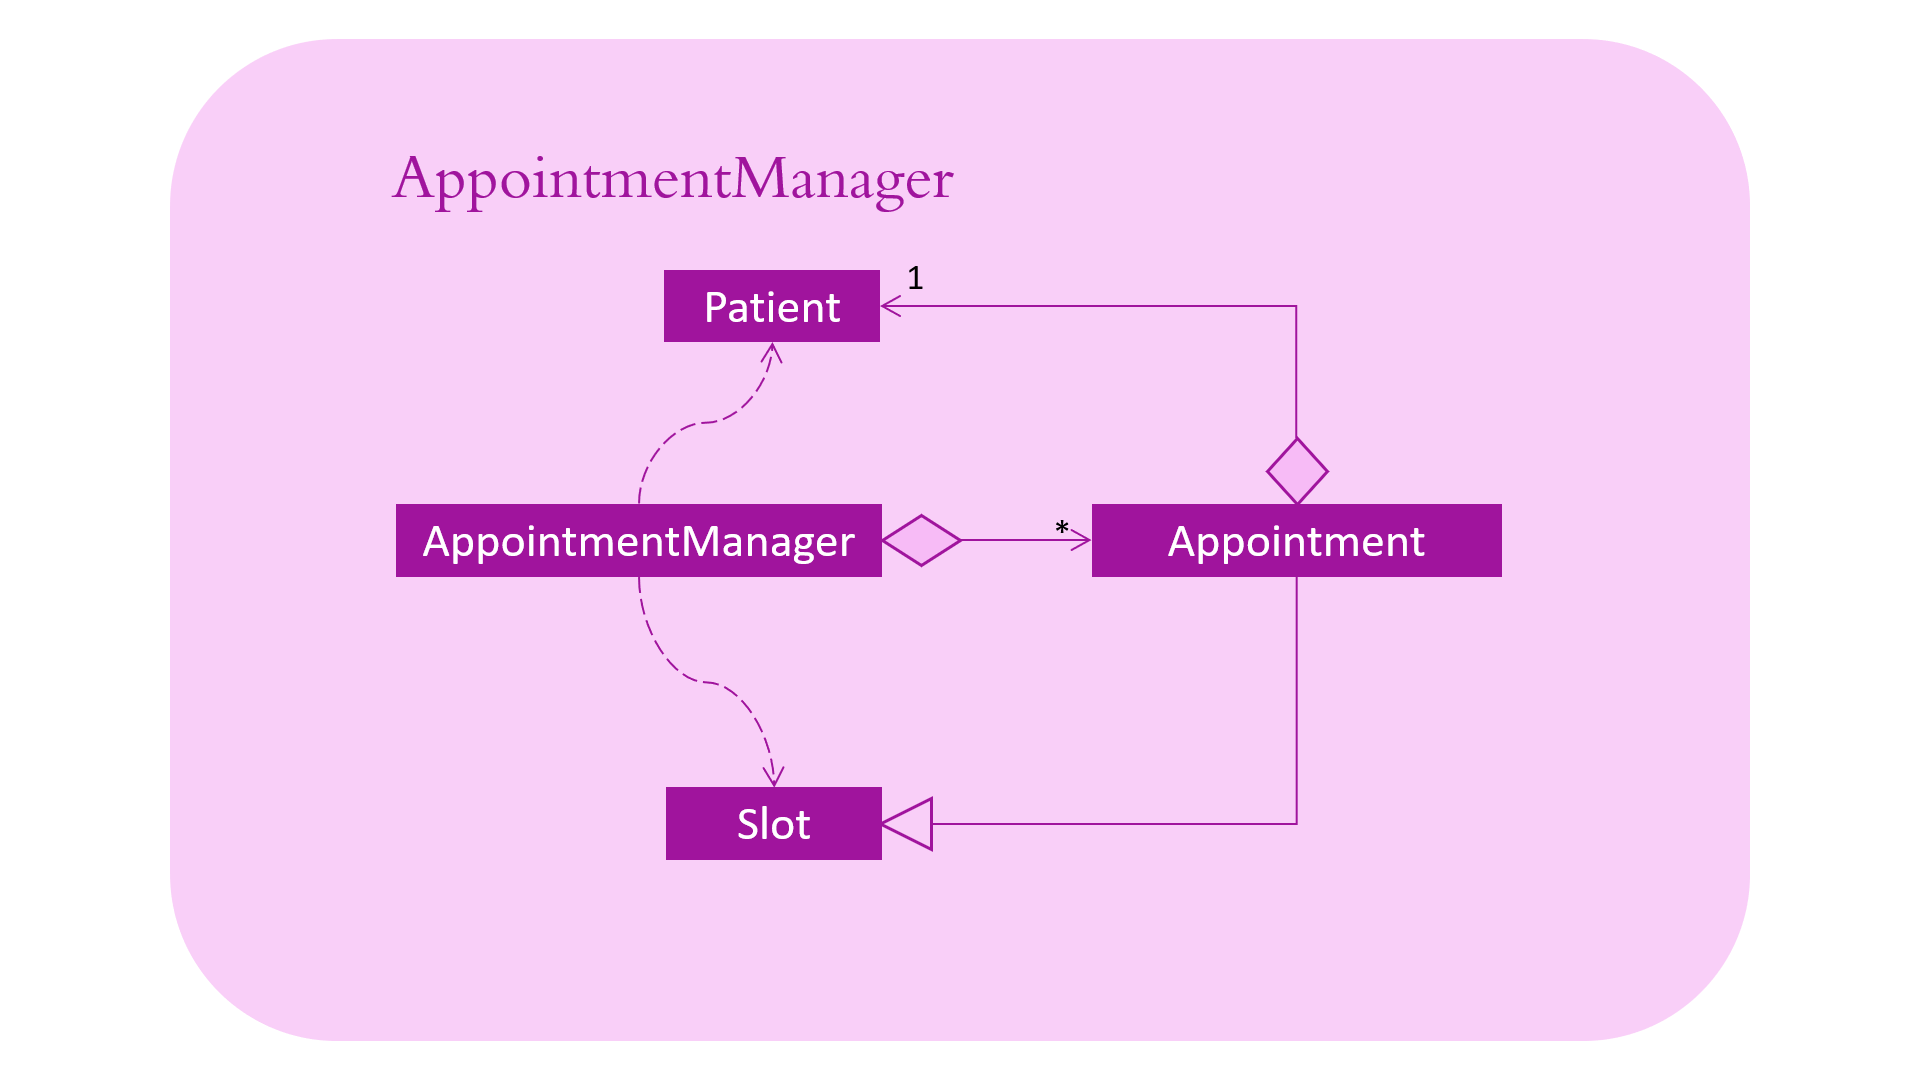
A Slot is used to represent a time block during clinic’s opening hour available for appointments.
Appointment extends slot and each appointment is assigned exactly one patient.
AppointmentManager holds a list of appointments which can then be operated on upon user commands.
3.4.6. Model for ReminderManager
QuickDocs supports reminding our users about upcoming appointments and warns users about medicines that is low in stock.
QuickDocs also supports customized reminders that could be set up by the users themselves.
The figure below illustrates how reminder module is implemented.
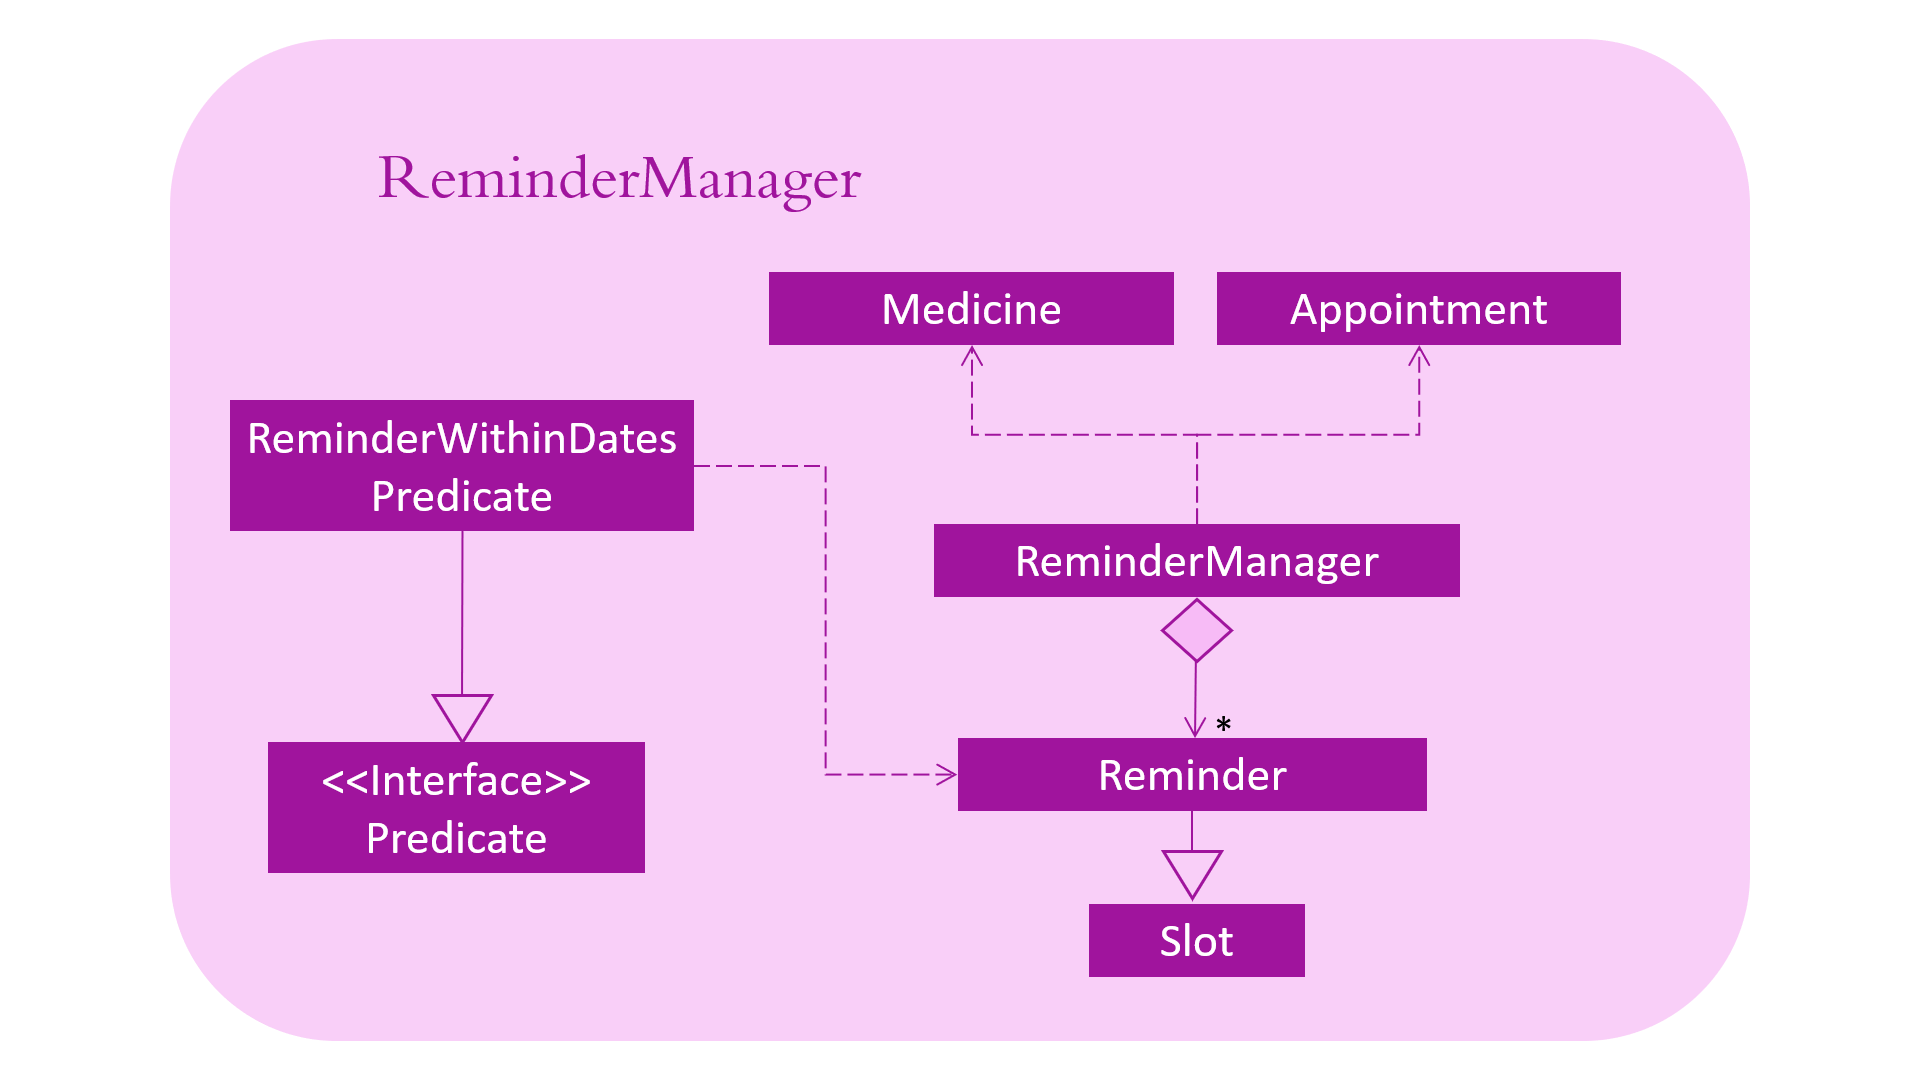
Reminder extends from slot, and has a starting date and end date. Users are free to customize reminders' title and comments for user-initiated reminders.
ReminderManager keeps a list of reminders sorted by the date of reminder. Reminders that expires, i.e passed the end date, will automatically be hidden from the panel list of reminders shown to the user.
Upon every subtraction or addition of medicine quantity in the inventory, the ModelManager calls the ReminderManager to check the sufficiency of medicine against the set threshold and update the reminder panel accordingly, so that the reminders for medicines in low stock is managed automatically upon every change in medicine quantity.
3.5. Storage component
The Storage component of QuickDocs allows data to be saved and read from a json file.
3.5.1. Structure of the Storage Component

API : Storage.java
The Storage component,
-
can save
UserPrefobjects in json format and read it back. -
can save all the QuickDocs data in json format into a single json file and read it back
-
this json file contains 8 different lists, with each list consisting of only one of the 8 main
JsonAdaptedClass objects.
-
3.5.2. When does QuickDocs read your data?
All data are stored in a json file, with a default filepath data/quickdocs.json. This filepath can be
customised in the preferences.json file.
When QuickDocs is launched, all information in the quickdocs.json file will be read. As mentioned in the previous
section, the json file contains 8 different lists, and each list will have their information converted to their
corresponding model types by their respective toModelType() methods of the 8 different JsonAdapted classes.
These converted objects will then be added into their respective class managers.
As mentioned in the Model Component section, the QuickDocs class is responsible for storing
all these data as it holds all the different class managers.
Note that there are only 6 managers but there are 8 JsonAdapted classes. This is because converted
JsonAdaptedStatistics and JsonAdaptedMonthStatistics objects are both stored in the StatisticsManager.
Similarly, both JsonAdaptedMedicine and JsonAdaptedDirectory objects are stored in MedicineManager.
Starting QuickDocs with no data
If the quickdocs.json is not found, or contains any errors such that any information cannot be converted to its
corresponding model type, QuickDocs will be launched in a clean slate. If it is the case that the json file
is erroneous, it will not be deleted, however it will be overwritten if any saving occurs during the current session.
3.5.3. When does QuickDocs save your data?
QuickDocs saves data whenever there is modification of any information in the current session.
Note that the user mainly interacts with QuickDocs by executing commands, and only some user commands will modify
its data. For example, commands such as listmed, to list medicines, or listapp, to list appointments,
will not affect the data. However, commands such as editpat, to edit a patient’s particulars, or addapp, to add
an appointment, will change the information stored in QuickDocs.
Hence, only methods that modifies data will indicate to the QuickDocs class that a modification occurred. All methods
that interact with the various class managers are contained in the ModelManager class, which holds a reference to
the main QuickDocs object and references to all class managers. The following are the steps taken when one of
these methods, in this case Model#addApp(), is called, which leads to data being saved:
-
Model#addApp()adds the providedAppointmentintoAppointmentManager. -
Model#addApp()then callsQuickDocs#indicateModification(), providing theboolean trueargument. This indicates that a change in data has occurred, which did happened since a newAppointmentobject had been added. -
LogicManager#execute()checks if any modification occurred, through theQuickDocs#isModified()method, which in this case returnstrue. -
LogicManager#execute()then saves the new modified QuickDocs data by callingStorage#saveQuickDocs(), providing it with theQuickDocsobject. The new modified data will now overwrite all data stored in thequickdocs.jsonfile.
Design considerations
We chose this implementation to ensure that no data will be lost due to any unforeseen circumstances. For example, if QuickDocs is closed unexpectedly, no data will be lost as any change in information has already been saved when that modification occurred.
3.6. Common classes
Classes used by multiple components are in the quickdocs.commons package.
4. Implementation
This section describes the details on how certain features are implemented.
4.1. Patient management module
The patient management module consists of these commands:
-
adding a patient record
addpat -
editing a patient record
editpat -
deleting a patient record
deletepat -
listing a patient record (by name, nric, tags or index)
listpat
The operations involved in the patient management modules involve the use of the model\Patient\PatientManager.java
class. The PatientManager maintains a list of patient records, which are loaded from the quickdocs.json file through the
storage component.
4.1.1. Adding a patient
Patient records consist of Name, NRIC, Email, Address, Contact, Gender, Dob (Date of Birth) and tagList fields. The addpat command
require users to enter the value of these fields prepended by prefixes. The prefixes are used to separate the parameters and assign the
values to these fields.

| tagList can contain multiple or no tags at all. |
4.1.2. Editing a patient
To edit a patient, a PatientEditedFields is first created. It consist of all the fields of a Patient object but all its values
are null initially. This means that only when the user enter a value for a specific field will it be assigned to the PatientEditedFields.
A temporary Patient object is then created with the values of the existing patient record to be edited. The PatientEditedFields will then
be checked against this temporary patient object and replace the fields which are non-null.
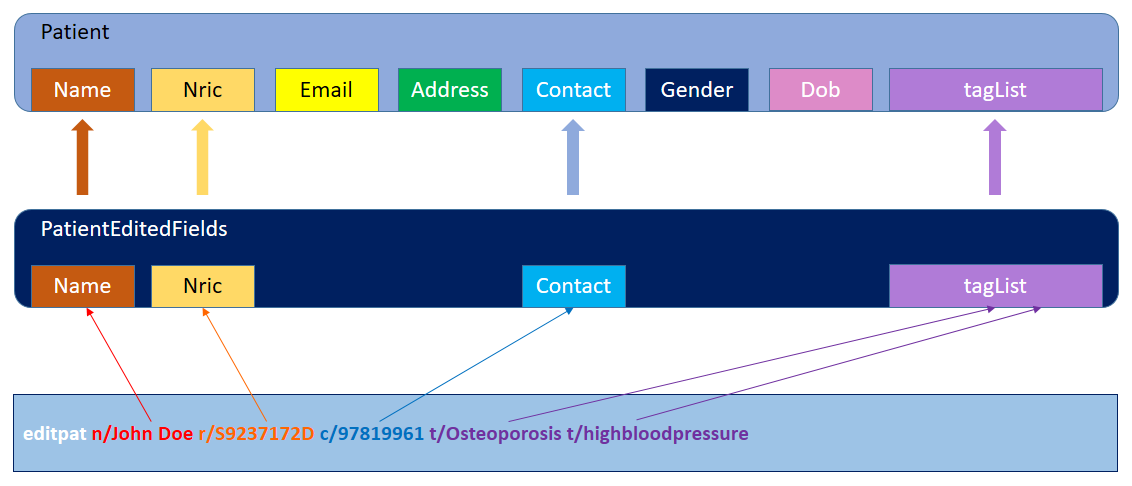
An additional check for NRIC will be done on the list of patient records to ensure that the editing of NRIC does not cause a conflict with existing Patient records. When this additional check is passed, the temporary patient object will replace the existing patient record designated for editing.
4.1.3. Deleting patient records
Each patient have a unique NRIC value. This is how QuickDocs differentiate between the different patient
records in the patient list in the PatientManager class.
To delete a patient record, the deletepat and a nric is specified. The patient list will be iterated and the record whose
NRIC matches the specified value will be removed.
4.1.4. Listing patient records
Since the patient records are stored in a list, their position in the list (index) can be used to view the details of a specific patient record.
The user can narrow down their patient record searches using the names, nric and tags assigned to each patient, and this results in a sublist
of patient records, with their index reflected to be shown on the main display of QuickDocs. The specific session can then be viewed by calling listpat along
with the index.
Internally, a ListCommand can
be created using four different constructors and each of them have a constructedBy field. The constructedBy field will indicate
whether the search is done by indexing, or filtering by name, nric or tags.
-
If indexing is used,
getPatientAtIndex()is called during the execution of the List command to simply retrieve the record in the patient list, at the position specified. -
If name is used,
findPatientsByName()will be called, and patient records whose names containing the sequence that the user entered will be retrieved. -
If the nric is used,
findPatientsByNric()is called and all patient records whose NRIC starts with the sequence supplied will be retrieved. -
If tag is used,
findPatientsByTagis called, retrieving all patient records tied with the tag specified.
Lastly, if listpat is called without any search parameters, QuickDocs will simply list the first 50 patients in the patient list.
4.2. Consultation management module
The consultation module consists of:
-
The consultation process
-
Listing of past patient consultation records
The listing of past patient consultation records is similar to the listing of patient records explained earlier, the only difference being it can only be filtered down by NRIC and viewed using indexing.
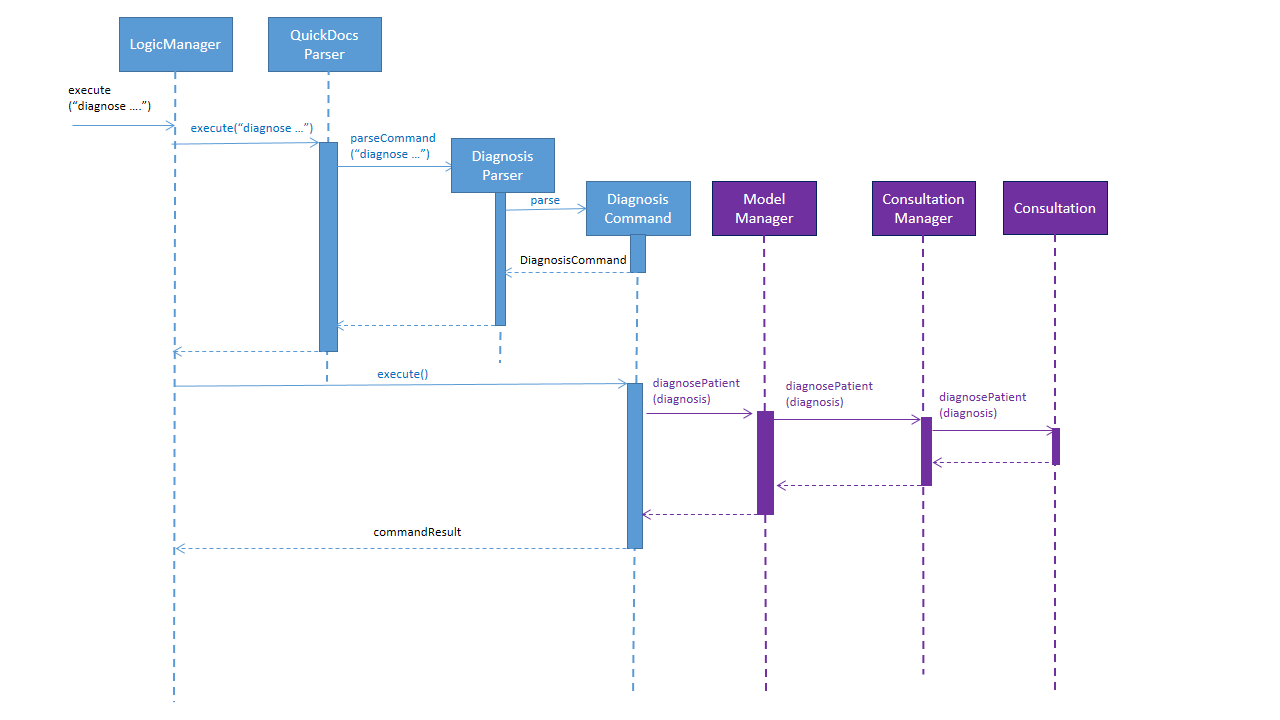
The consultation process on the other hand, comprises of four stages: starting, diagnosis, prescribing and ending the consultation session. It leverages on the actions done in the patient module and forms the bulk of the processes in the consultation module.
The following section will provide a more in-depth exploration of how the consultation process is implemented. This includes:
-
The explanation of the design and mechanism behind the consultation process
-
The decision making process of selecting the current implementation
4.2.1. Current Implementation for the consultation process
The consultation process comprises of four stages:
-
starting the consultation with a selected patient
-
entering the symptoms, assessment of the patient’s current condition
-
entering the medicine to be prescribed
-
ending the consultation
The consultation process is facilitated by the ConsultationManager.java class.
The ConsultationManager class holds the current consultation session and a list of past
consultation records for every patients.
Methods in the ConsultationManager comprises of:
-
createConsultation(Patient)— Starts a consultation session with the current selected patient -
diagnosePatient(Diagnosis)— Record symptoms patient mentioned and the assessment of the current condition. -
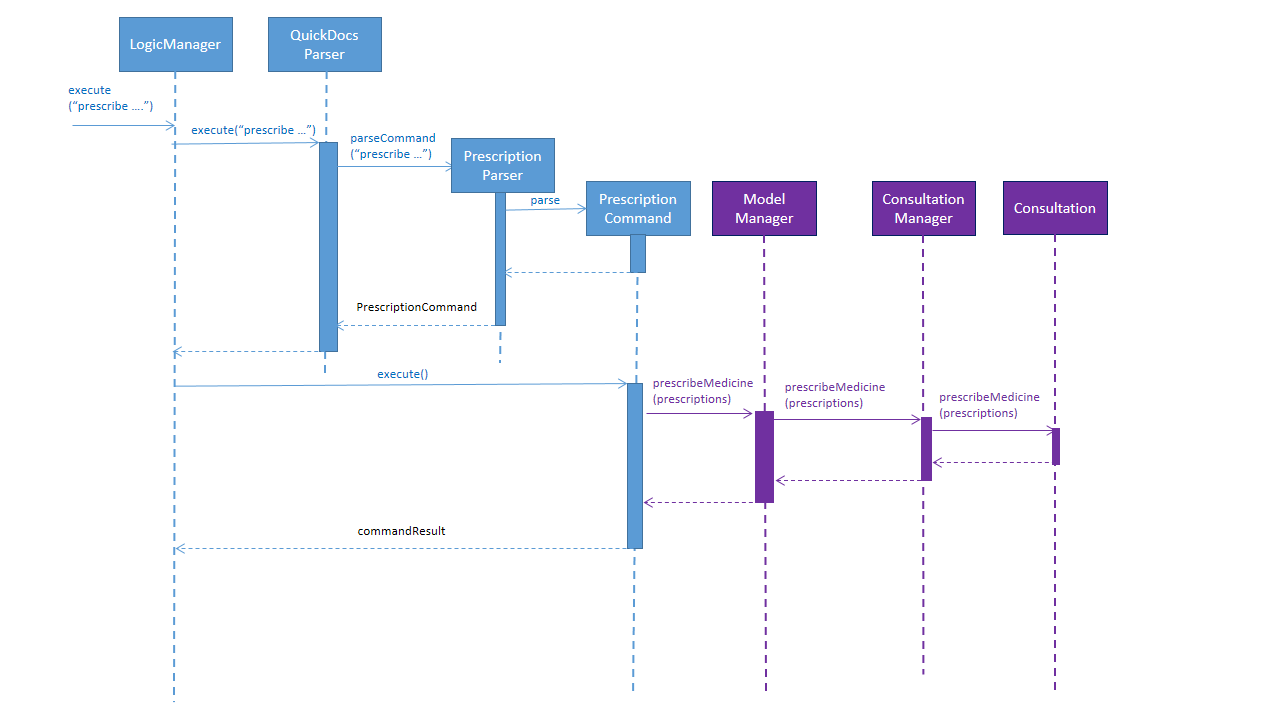
prescribeMedicine(List of Prescriptions)— Prescribe the medicine and the quantities to be administered. -
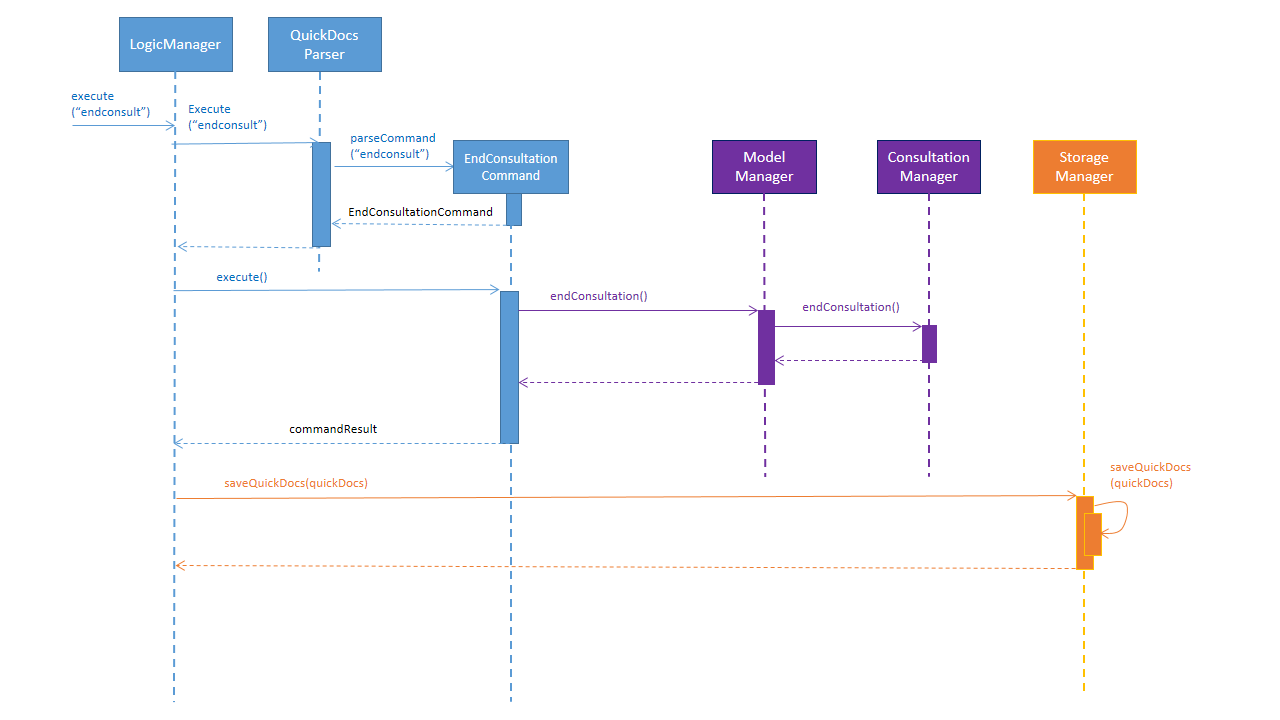
endConsultation()— Ends the consultation session. No further edits can be made to both prescription and diagnosis.
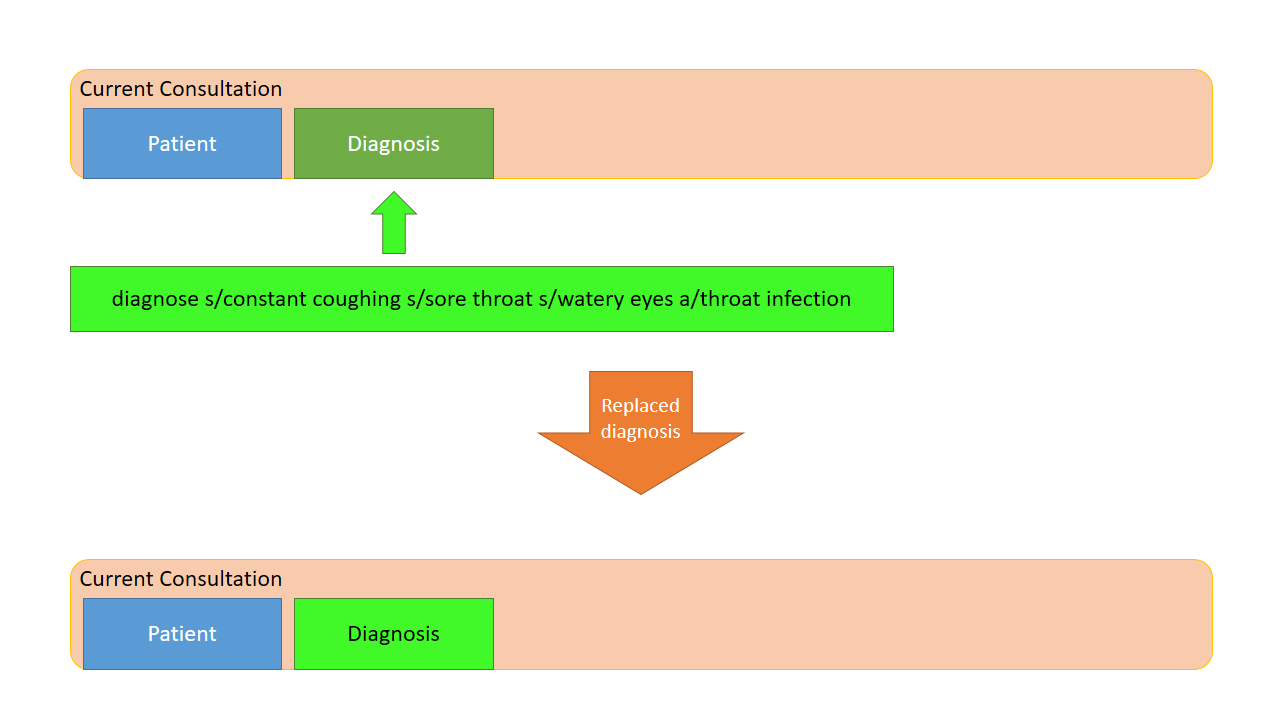
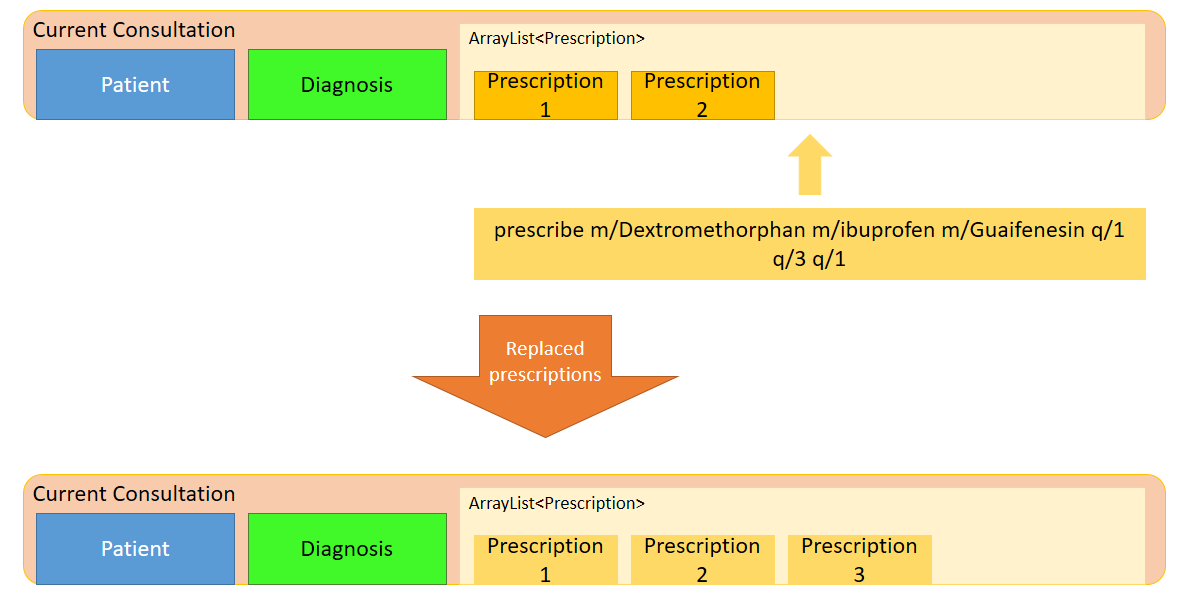
Both diagnosePatient and prescribeMedicine are repeatable. The values entered during the repeated command will simply replace
the existing diagnosis / prescription.
| QuickDocs only permit one ongoing consultation. During diagnosis and prescription, changes are only made to the current consultation session. The previous consultations should not be edited to prevent falsification of medical records. The current consultation session can only end after both the diagnosis and prescription are finalized. |
Given below is an example usage scenario:
Step 1. A previously registered patient arrives and the doctor starts the session by
entering the consult command in this manner: consult r/NRIC of the patient. A message to indicate
the start of the consultation will be shown in the results display.
-
if the patient is new and his or her details are not recorded in QuickDocs, the command will not be executed and the doctor will be alerted that the consultation cannot continue since no patient records with the entered Nric can be found. An invalid nric entered will also prompt the same response

Step 2. The patient will tell the doctor what are his / her ailments. The doctor will record the symptoms
down. The doctor will then make the assessment of the illness the patient is having and execute the command by clicking
on the Enter on the keyboard.
-
The symptoms and assessment have to be prepended by the
s/anda/prefix respectively -
The command entered by the doctor will look something like this:
diagnose s/constant coughing s/sore throat a/throat infection

Step 3. Should the patient inform the doctor of additional symptoms after the diagnosis is given, the doctor can simply press
the up and down key to display the previously entered command on the userInput area. The doctor can then add the new symptom in and
press Enter, replacing the previously recorded diagnosis.
Step 4. The doctor will then add the medicine to the prescription list, followed by the quantities. Medicine are prepended by the m/ prefix while
quantities are prefixed by q/.The order of the quantity entered corresponds with the order the medicine is added in the command:
-
prescribe m/Dextromethorphan m/ibuprofen q/1 q/2In this case q/1 represents one unit of Dextromethorphan cough syrup is issued while 2 units of ibuprofen (inflammatory tablets) are issued to the patient -
Alternatively, the doctor can enter the quantity right after the medicine:
prescribe m/Dextromethorphan q/1 m/ibuprofen q/2
If any of the medicine issued are insufficient to complete the prescription, or is simply not in the inventory, a message will be displayed in the inputFeedback area. The command will not be executed and remains in the userInput text field. The doctor can then make the changes to the command.

Step 5. Just like the diagnosis command, prescription can be replaced by reentering the command.
Step 6. After explaining the medicine intake to the patient, the doctor can then end the consultation session on QuickDocs by using the command
endconsult. No further changes to the consultation records can be made from this point on.
The following sequence diagrams summarizes what happens when a user perform the entire consultation process, starting with the session initialisation:
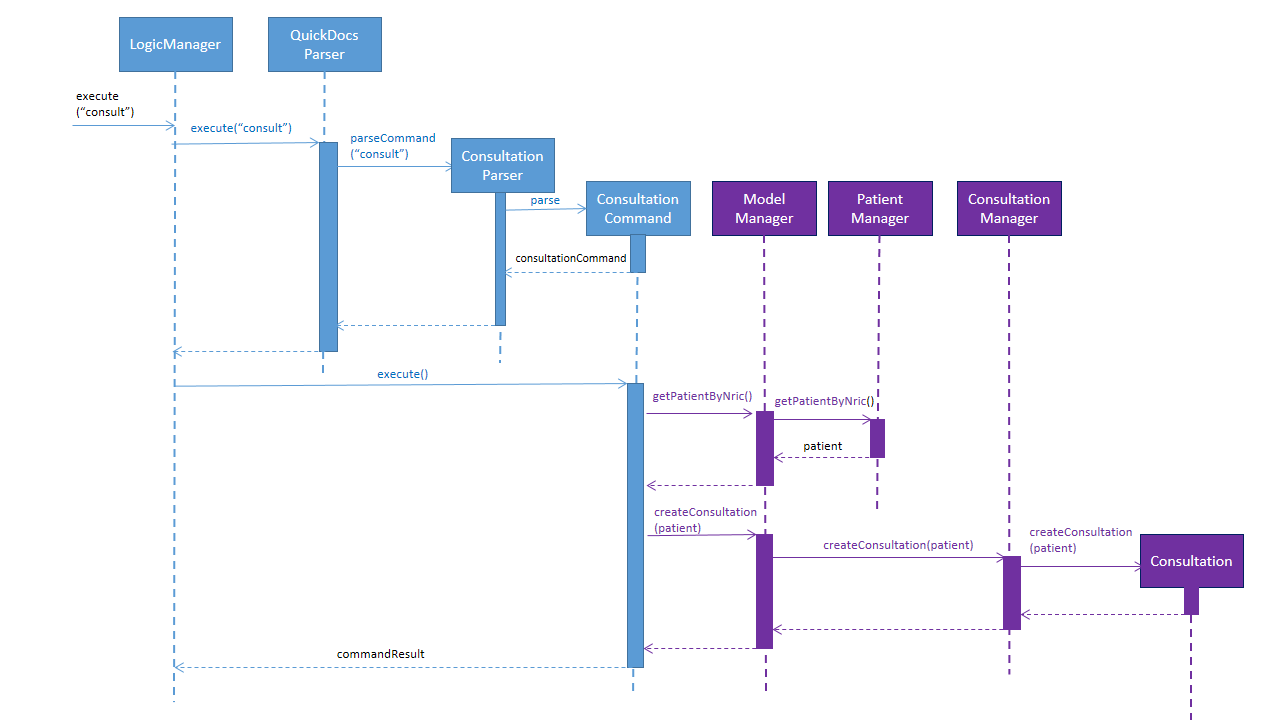
Followed by the adding of the diagnosis:
prescribing the medicine to tackle the patient’s condition:
finally, saving the consultation record into QuickDocs:
4.2.2. Design considerations
-
In a neighbourhood clinic setting, doctors usually tend to only one patient at a time. This is why QuickDocs only allow a single ongoing session in the consultation process.
-
In Singapore, every person is given a unique NRIC / FIN number regardless of their citizenship statuses. As such the NRIC is used to search for the patient records to start the consultation session.
-
The prescription and diagnosis commands are made to override their previous states to ease the modification of consultation data. Doctors can simply use the command history to navigate to the previous command entered, make the changes and then execute the command. This allow them to simply add a few words to change consultation data rather than re-entering the entire command line.
-
Prescription can actually be added before the diagnosis is recorded. The doctor could be expecting a patient for regular checkup and prepare the prescription before the patient enters the room. If the condition remains the same as before, the doctor can simply enter the diagnosis to complete the consultation session, cutting down the time spent on the consultation session.
4.2.3. Alternatives considered
Prior to the current implementation, a few options for the overall consultation process was considered:
| Alternative | Description | Pros | Cons |
|---|---|---|---|
Consultation as one single command |
Doctor enter |
Consultation is now restricted to just one class The consultation creation will truly be one-shot |
Input will be verbose, easy for the doctor to make mistakes Harder to spot and navigate to the erroneous part to make changes No room for the doctor to make changes as the consultation could have ended with erroneous information recorded |
Iterative consultation creation |
Doctor enter Doctor get prompted to enter symptoms and assessment. Doctor get prompted to enter prescription. Consultation is ended once prescription is recorded |
Less likely to enter erroneous data as consultation is now broken down to different stages |
The consultation will take a longer time to be completed Doctor can only diagnose and prescribe during the session, while other related actions (such as listing past records) can only be done after the consultation |
Separate commands for start, diagnose, prescribe and end (Chosen implementation) |
Doctors begin and end session with Prescriptions and diagnosis can be added or replaced using the |
The editing involve the replacement of the current diagnosis or prescription entry, commands can be reused to perform both add and edit operations. Editing remain one shot and fast as users can make use of the command history to make changes to a previously entered command to make changes. Flexibility in recording consultation details, instead of having to go through the start, diagnose, prescribe, end order strictly. Room for other commands to be executed while a session is ongoing. |
Potentially more commands will be called when compared to the other options. diagnosis and prescription commands entered could be verbose and doctors can make mistakes easily. |
Fragment diagnosis and prescription commands even more |
Same as the third alternative, but there are commands specific to the adding of symptoms in diagnosis, adding of medicine in prescription. Separate commands for editing the symptoms added or medicine prescribed |
Shorter commands to add symptoms or prescribe medicine. Less mistakes will be made. Doctors only need to edit specific entries instead of retyping or navigating to previously entered command and make changes. |
Way more commands to be entered by users. Even more commands and methods to be written, there will be a higher possibility of bugs arising from the increase in code volume. |
Although the selected option require more input and lengthier commands, it guarantees the flexibility and efficiency QuickDocs aim to deliver for doctors in neighbourhood clinics.
These are some of the considerations taken before the decision was made:
-
Since QuickDocs aim to provide a single interface for doctors to perform clinical operations more efficiently, the consultation process will require one shot commands to fulfill the efficiency requirement of the overall product.
-
It is highly possible for doctors to make mistakes with the one-shot commands, especially when there are so many parameters involved in a single command. Therefore the implementation must provide a convenient form of error recovery.
-
There could be interleaving operations between the modules, such as viewing past consultation records or checking medicine inventory in the midst of the consultation. The implementation must be flexible enough to allow cross module commands during a consultation.
Although the selected option require more user input and involve lengthier commands, a doctor with fast typing speed will be able to circumvent the issues of slightly more verbose command lines easily.
If the doctor enters an erroneous command or simply want to make changes, the command history can be used in conjunction with the one shot commands to make changes quickly.
The selected option also do not restrict doctors to just consultation-related commands. He or she can perform other operations such as checking the inventory or view free appointment slots during the consultation itself.
The selected implementation guarantees the flexibility and efficiency that QuickDocs aim to deliver for doctors in neighbourhood clinics.
4.3. Appointment management module
The Appointment module provides the user with greater control over his/her scheduled appointments by organising them neatly and preventing any clash of appointment timings. Listed below are the commands that the appointment module features:
-
Adding an appointment,
addapp -
Listing appointments,
listapp -
Deleting an appointment,
deleteapp -
Listing free appointment slots,
freeapp
These features are supported by the AppointmentManager class, which stores all created appointments in an ArrayList.
On QuickDocs launch, existing appointments are read from the quickdocs.json file through the storage component.
4.3.1. Appointments
An Appointment is a subclass of the Slot class, and has the following 5 compulsory fields:
-
Patient patient- the patient who made this appointment -
LocalDate date- the date of this appointment -
LocalTime start- the time this appointment starts -
LocalTime end- the time this appointment ends -
String comment- any other details for this appointment
4.3.2. Adding an appointment
The user can add an appointment to his/her schedule to keep track of future meetings, by using the addapp command.
All 5 fields of an appointment, as mentioned in the Appointments section, must be specified together with
the command.
Input validation
These fields are parsed by the AddAppCommandParser class, creating an AddAppCommand object, which then carries out
the following steps before adding the appointment into QuickDocs:
-
Retrieve the
patient, if he/she exists, by callingModel#getPatientByNric(). Note that the user specifies thepatientof the appointment by providing the patient’s NRIC, hence the need for this step. -
Check if the
startandendtimings are valid. The appointment timing has to be within office hours (9am to 6pm) and thestarttime must not be after or equal to theendtime. -
Create the appointment using the given fields and check if this appointment has any conflict in timing with other existing appointments, by calling
Model#hasTimeConflicts(). -
Finally, add the appointment into
AppointmentManagerby callingModel#addApp().
If any of the steps 1 to 3 fails, a CommandException will be thrown and the corresponding exception message will
be shown to the user.
|
Adding the appointment into AppointmentManager
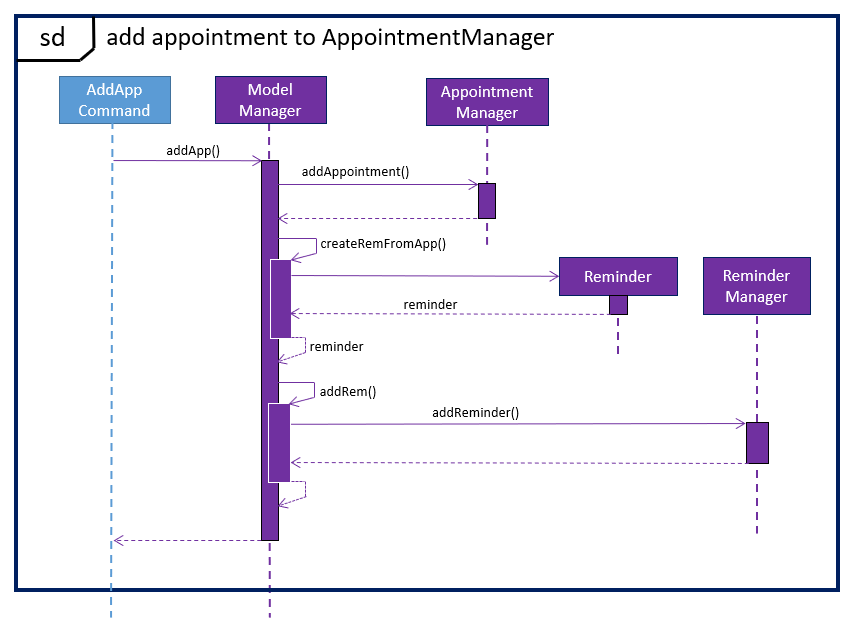
Listed below are the steps taken when the Model#addApp() method is called. Note that
when an appointment is added, a reminder tailored for this appointment will also be added. This was implemented to
ensure that the user does not forget about the appointment in the future.
-
Add the given appointment into the
AppointmentManagerby calling itsaddAppointment()method.-
AppointmentManager#addAppointment()takes in the appointment to be added and adds it into theArrayListof appointments in its sorted position. This ensures that this list of appointments is always sorted by date and time, with the earliest appointment at the start of the list.
-
-
Create a reminder tailored to this appointment by calling
Model#createRemFromApp(). -
Add the newly created reminder into the
ReminderManagerby callingModel#addRem().
| You can learn more about reminders in the Reminder management module section. |
All these steps that are executed when the addapp command is called can be summarized in the
Sequence Diagrams shown below:
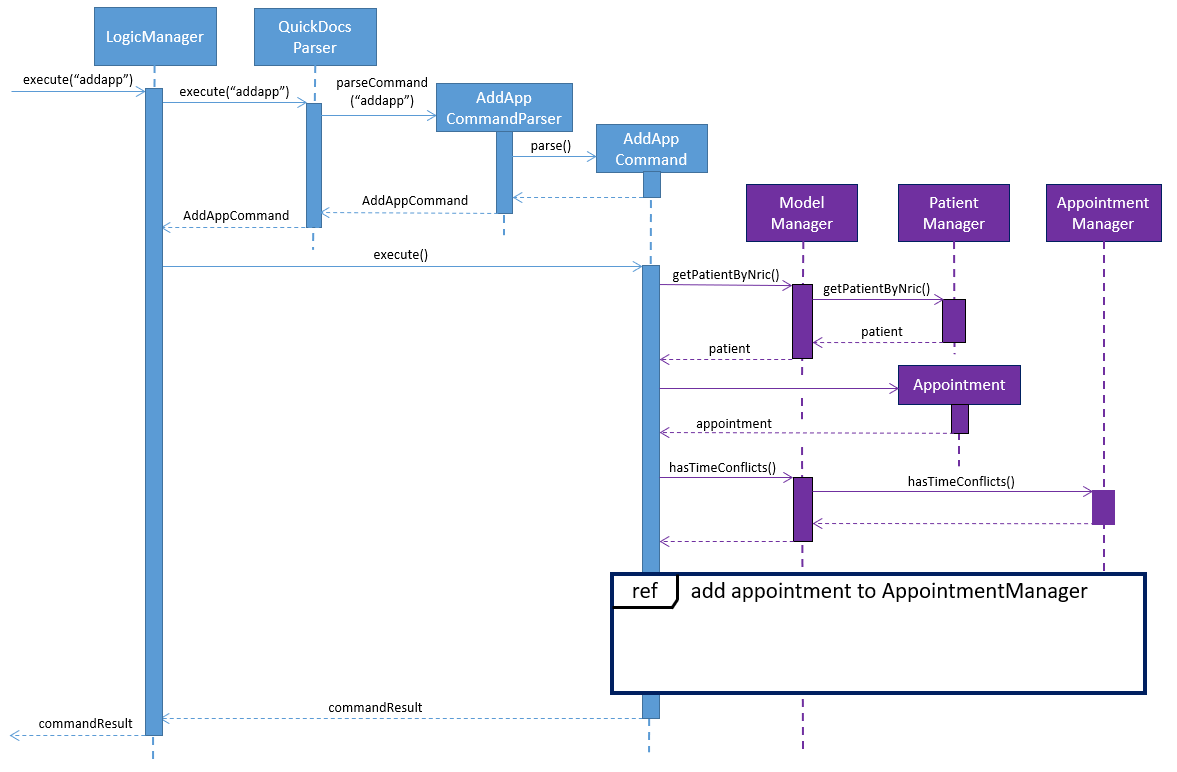
addapp is called
4.3.3. Listing appointments
The user can list his/her past or future appointments using the listapp command. The user can either provide a range
of dates to list out all appointments in those dates, or provide an NRIC to list out all appointments for the patient
with the given NRIC.
If the user does not specify a FORMAT and DATE, FORMAT will default to week and DATE will default to the
current date, meaning that the current week’s appointments will be displayed.
|
Listing by dates
The user can specify the range of dates by providing a FORMAT (day, week, or month) and a DATE, which means to
list all appointments on the FORMAT (day/month/week) of DATE. The following steps will then be taken:
-
The
ListAppCommandParserclass parses these two parameters intoLocalDate startandLocalDate end, and creates aListAppCommandobject.startandendrepresents the start and end dates of the range of dates of appointments to be listed. -
ListAppCommandwill then be executed, callingModel#listApp(), providing it with thestartandenddates. -
Model#listApp()then callsAppointmentManager#listAppointments(), with the same 2 arguments, which will return aStringof all appointment information within the given range of dates.
Listing by patient’s NRIC
In this case, the user only provides the NRIC of a patient together with the listapp command. The following steps
will then be taken:
-
The
ListAppCommandParserclass parses the user input into anNRICobject, creating aListAppCommandobject with thisNRICfield. -
ListAppCommandexecutes:-
Firstly, it retrieves the patient with the provided
NRIC, if exists, by callingModel#getPatientByNric(). -
Model#listApp()will then be called, providing it with the patient retrieved.
-
-
Model#listApp()then callsAppointmentManager#listAppointments(), providing it with the patient, which returns aStringof all the given patient’s appointment information.
Model#listApp() and AppointmentManager#listAppointments() are overloaded methods, having different method
signatures based on their parameters. One implementation takes in two LocalDate parameters, start and end, while
the other implementation takes in a single Patient object. This allows the same method name to be called, and list
appointments by either providing a range of dates or a valid patient respectively.
|
4.3.4. Deleting appointments
The user can delete any appointments created using the deleteapp command. Since there cannot be any clash in timings
for appointments, any appointment can be identified uniquely by its date and start time. Hence the user can specify
the appointment to be deleted only with those two fields, after which the following steps are taken:
-
The
DeleteAppCommandParserclass parses the two parameters intoLocalDate dateandLocalTime startthat specifies the date and start time of the appointment to be deleted respectively. It then creates aDeleteAppCommandobject with these two fields. -
DeleteAppCommandexecutes:-
Firstly, it checks if
startis a valid timing, checking if it is within office hours (9am to 6pm). -
Next, it retrieves the specified appointment, if it exists, by calling
Model#getAppointment(), providing it withdateandstart. -
Finally,
Model#deleteAppointment()is called, providing it with the appointment retrieved.
-
-
Model#deleteAppointment()then callsAppointmentManager#deleteAppointment(), providing it with the appointment.AppointmentManager#deleteAppointment()will then remove the appointment from theArrayListof appointments stored inAppointmentManager.
4.3.5. Free appointment slots
Before deciding on an appointment timing, the user can execute the freeapp command to list out all the timings available for
a new appointment booking.
Command format: freeapp f/FORMAT d/DATE
We can see that the freeapp command takes in two parameters:
-
FORMAT: can beday,week, ormonth -
DATE: a valid date
This command can be roughly translated to:
"Search for free appointment slots on the FORMAT (day/month/week) of DATE."
The FreeAppCommandParser class will parse these two parameters into two dates, LocalDate start and LocalDate end,
representing the start and end dates of the search range for free appointment slots. FreeAppCommandParser then
constructs a FreeAppCommand object with the start and end fields.
If the user does not specify a FORMAT and DATE, FORMAT will default to month and DATE will default to the
next month’s date, meaning that free appointment slots for the whole of the following month will be displayed.
|
Current Implementation
The search is facilitated by the AppointmentManager class which stores all created Appointments in an ArrayList.
AppointmentManager contains the method listFreeSlots() which firstly calls AppointmentManager#getFreeSlots().
getFreeSlots() is the main method that implements the logic behind freeapp.
Given below are the steps taken when listFreeSlots() is called.
Step 1. The method listFreeSlots() takes in the two arguments, start and end, which have been mentioned previously.
Firstly, listFreeSlots() calls getFreeSlots(), providing it with the same two arguments, to retrieve a List of
free Slots before it can parse them into a String.

Step 2. In getFreeSlots(), we first retrieve the existing appointments that are within this given search range
by using the method AppointmentManager#getAppointments().

Step 3. Next, we look at all the appointments that are present on the start date, as shown in the diagram below.
These appointments are sorted by date and time, with the earliest appointment on the left and the latest on the right.

Since the appointments are already sorted, we do not need to search through the whole appointment list to
find appointments present on the start date. We can simply go through the list from the beginning
until we reach an appointment date that is not equals to start.
|
Step 4. We fill in each empty 'gap' between any two appointments by creating a Slot object.
Each Slot object represents a single time period on a single date. It has three attributes:
-
LocalDate date- the date of this time slot. -
LocalTime start- the start time of this time slot. -
LocalTime end- the end time of this time slot.
In this freeapp context, these slots created represents a time period without any scheduled appointments.

| Slots will only be created for timings during office hours (09:00 to 18:00). This is to prevent any possible inconvenience caused if the user accidentally decides on a timing outside of office hours. (Even though there will be an office hour constraint when the user eventually creates the appointment.) |
Step 5. We repeat Steps 3 and 4, replacing the start date with the remaining dates until the end date.
All slots created will be added into an ArrayList of free slots, freeSlots.

Step 6. After all the slots are added, we return freeSlots to the caller function listFreeSlots(),
to generate a String that represents all the free slots to be appended onto the main display of the UI.
We can summarize the steps taken after the freeapp command is called in the Sequence Diagram below:
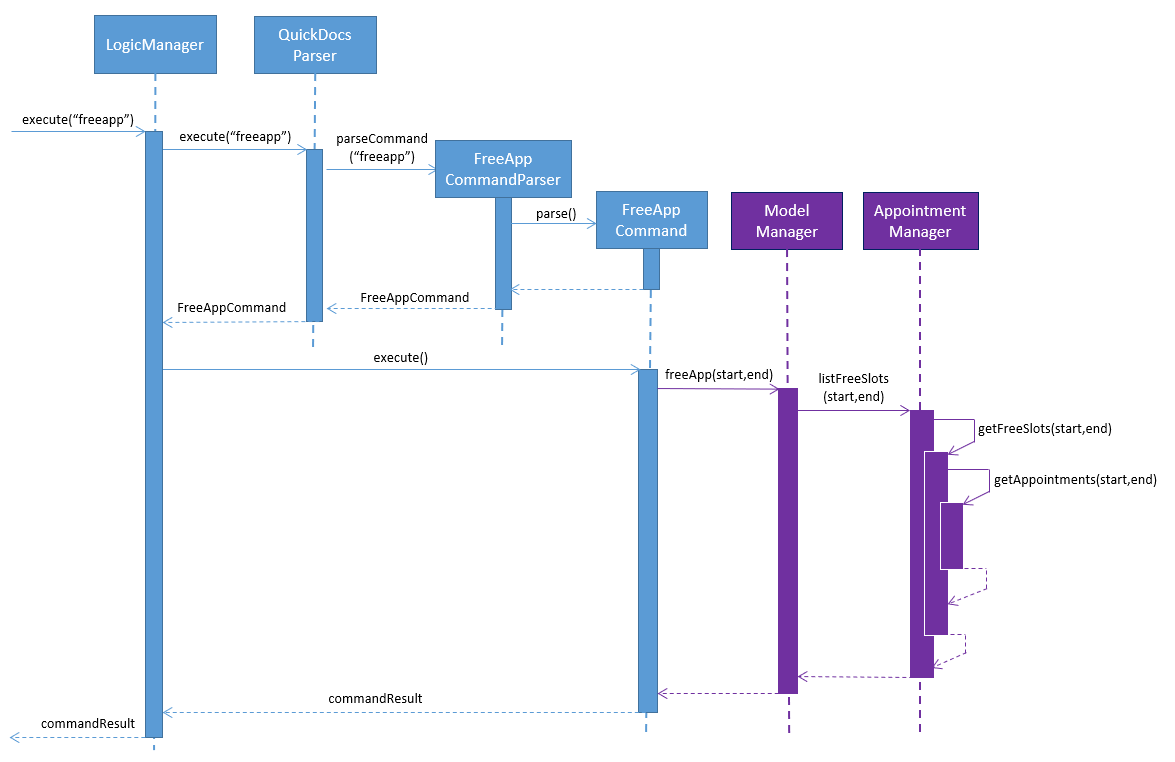
freeapp is calledDesign Considerations
Listed below are some of the considerations we took when designing the freeapp command.
-
This feature was implemented for the convenience of the user in choosing a valid appointment slot with his/her patient. It is more intuitive to decide on an appointment slot based on all the empty slots shown, rather than listing out all existing appointments using
listappand then figuring out what timings are available from there. -
We require the user to specify the search range by listing the
FORMATandDATEinstead of the thestartandenddates directly, to make the command more user friendly. The user does not have to be bothered with the exact range of dates to search, and can simply specify a rough date and be provided with information for the neighbouring dates if theFORMATgiven isweekormonth. Moreover, if the user wants to list all free slots for the whole month, they do not have to check what the last date of the month is in order to specify the end date.
Alternatives Considered
Listed below are the methods considered to implement the freeapp command.
| Alternative | Description | Pros | Cons |
|---|---|---|---|
Maintain a permanent list of free slots |
Maintain a list of free slots for a pre-determined range (e.g. next three months) instead of creating a new list
every time |
It will be quicker to search for free slots as the list is already created. We simply need to filter the list with the given search range and print out the resulting filtered slots. |
Tedious work needs to be done to maintain this permanent list of free slots, as it has to be modified whenever an appointment is added or deleted. Also, if the given search range is not within the range of this consistent list of free slots, this list will still have to be created from scratch, defeating the purpose of maintaining this permanent list. |
Generate free slots only when required (Chosen implementation) |
We will only generate a list of free slots when the |
The user is given the flexibility to specify the range of dates to list the free slots, as this list is generated on the spot, and is not limited to the dates of a pre-determined list. |
Since the generated list of free slots is not stored, extra work will be done in generating the same free slots
when the next |
We decided to implement the second method, as it is more straightforward. Here are the reasons why:
-
The first implementation is actually just an extension of the chosen implementation as it still requires a way to generate a list of free slots, either when QuickDocs is launched or when the user requests a search range outside of the pre-determined list.
-
The first implementation additionally requires more effort to maintain this permanent list whenever the list of appointments is modified, which is not straightforward to implement. For example, we need a method to merge two free slots when an appointment is deleted, and another method to split a free slot into two when an appointment is added.
-
The benefit of a permanent list of free slots is the quicker execution time of
freeapp, which will typically only be called a small number of times (around 10) a day, when the user books an appointment slot with his/her patient. The total time saved on executingfreeappa small number of times is therefore negligible. -
QuickDocs already has plenty of data to be stored, such as appointments, consultations and medicine records. The minimal benefits that a permanent list of free slots provide does not justify its additional storage cost.
4.4. Reminder management module
The Reminder module provides the user with a way to keep track of future tasks, to-dos, or appointments. The reminders will be displayed on the reminder side bar, and are colour coded as such:
-
Blue: Reminder for a scheduled appointment
-
Red: Reminder to stock up on a medicine
-
Beige: Any other personal reminders
Listed below are the commands that the reminder module features:
-
Adding a reminder,
addrem -
Listing reminders,
listrem -
Deleting a reminder,
deleterem
These features are supported by the ReminderManager class, which stores all created reminders in an ArrayList.
On QuickDocs launch, existing reminders are read from the quickdocs.json file through the
storage component.
4.4.1. Reminders
A Reminder is a subclass of the Slot class, and has the following 5 fields:
-
String title- the title/header for this reminder -
LocalDate date- the date for this reminder -
LocalTime start- the start time for this reminder -
LocalTime end- the end time for this reminder -
String comment- any other details for this reminder
Only the title, date and start attributes are compulsory fields for a reminder.
4.4.2. Adding a reminder
The user can take note of a task to do by creating a reminder using the addrem command. As mentioned in the
Reminders section, only the title, date and start attributes are compulsory fields and must be
specified together with the addrem command. Fields end and comment are optional. Below are the steps taken
after the user executes the addrem command.
-
The
AddRemCommandParserclass parses the user input into 3 to 5Reminderfields. -
The
Reminderobject is constructed by the parser with the given fields. -
An
AddRemCommandobject is created, providing it with the reminder object to be added. -
AddRemCommandexecutes:-
Firstly, it checks if there is a duplicate reminder using the
Model#duplicateRem()method, which subsequently callsReminderManager#hasDuplicateReminder(). -
If there are no duplicates,
Model#addRem()is called, providing it with the given reminder.
-
-
Model#addRem()then callsReminderManager#addReminder(), providing it with the given reminder.ReminderManager#addReminder()will then add the reminder into theArrayListof reminders stored inReminderManager.
| The added reminder will only appear on the reminder sidebar if the date of the reminder is within the range of dates that the sidebar is currently displaying. More information can be found in the next section, Listing Reminders. |
Automatic generation of reminders
Some reminders will be created and added automatically.
-
Appointment reminders
-
When an appointment is added, a reminder for this appointment will be generated automatically. More information can be found in the adding an appointment section.
-
-
Low medicine alarm reminders
-
The user is able to set a threshold for each medicine in the inventory by using the
alarmcommand. When the quantity of a medicine drops below its threshold, a reminder will be created to alert the user of the low medicine quantity. More information can be found in the medicine implementation section.
-
4.4.3. Listing reminders
The reminders displayed on the reminder sidebar can be filtered using the listrem command.
Displaying reminders on the sidebar
Similar to the listapp command, the user can specify a range of dates by providing a FORMAT
(day, week, or month) and a DATE, which means to display all reminders on the FORMAT (day/month/week) of DATE.
The following steps will then be taken:
-
The
ListRemCommandParserclass parses these two parameters intoLocalDate startandLocalDate end, and creates aListRemCommandobject.startandendrepresents the start and end dates of the range of dates of reminders to be displayed on the sidebar. -
ListRemCommandexecutes:-
Firstly, a
ReminderWithinDatesPredicateobject will be created with the givenstartandenddates. This predicate is used to update theFilteredListof reminders contained in theModelManagerclass. -
Next,
Model#updateFilteredReminderList()is called, providing it with the created predicate.
-
-
The
FilteredListof reminders will be updated to match the range of dates given and the reminder sidebar is updated.
If the user does not specify a FORMAT and DATE, FORMAT will default to week and DATE will default to the
current date, meaning that the current week’s reminders will be displayed.
|
Display a single reminder
The listrem command can also be used to display the details of a single reminder onto the main display. This is useful
when the title or comment of a reminder is too long to be displayed fully on the sidebar. The user can do so by
providing the index of the reminder, as shown in the sidebar, together with the listrem command.
-
The
ListRemCommandParserclass parses the user input into anIndexobject, and creates aListRemCommandobject consisting of theIndexfield. -
ListRemCommandexecutes:-
Firstly, it retrieves the currently displayed
Listof reminders by callingModel#getFilteredReminderList(). -
Next, it checks if the given
Indexis valid, checking if theIndexis present in the currentListof reminders. -
If the
Indexgiven is valid, the reminder to be displayed is retrieved using theList#get()method on theListof reminders.
-
-
The information of the selected reminder is then appended onto the main display of the UI.
Displaying a single reminder can also be done by clicking on the reminder in the sidebar with a mouse. This feature
is supported by the ReminderListPanel class which is a UI component for the reminder sidebar. It contains the
Node#setOnMouseClicked() method that takes in an EventHandler, which is specified to display the reminder
details when the reminder is clicked.
4.4.4. Deleting a reminder
Deleting a reminder is simple, as the user only needs to specify the index of the reminder shown on the sidebar,
together with the deleterem command. The process, when deleterem is called, described below is similar to the
process when listrem is called to display a single reminder.
-
The
DeleteRemCommandParserclass parses the user input into anIndexobject, and creates aDeleteRemCommandobject consisting of theIndexfield. -
DeleteRemCommandexecutes:-
Firstly, it retrieves the currently displayed
Listof reminders by callingModel#getFilteredReminderList(). -
Next, it checks if the given
Indexis valid, checking if theIndexis present in the currentListof reminders. -
If the
Indexgiven is valid, the reminder to be deleted is retrieved using theList#get()method on theListof reminders. -
Model#deleteReminder()is called, providing it with the reminder to be deleted.
-
-
Model#deleteReminder()subsequently callsReminderManager#delete()to delete the given reminder from theArrayListof reminders stored inReminderManager.
4.5. Record & Statistics feature
4.5.1. Current implementation
The statistics command is started through the command stats START_MMYY [END_MMYY].
The two MMYY corresponds to a range of dates. The end range is optional,
4.6. Administrative and Statistics Module
The administrative and statistics module currently consists of 2 commands:
-
setting the consultation fee
setconsultfee -
querying the statistics
statistics
This 2 commands makes use of the classes located in filepath model\record.
4.6.1. Consultation fee
The consultation fee of the clinic is stored as a BigDecimal in the StatisticsManager of QuickDocs, which is loaded from the quickdocs.json file through the storage component. The consultation fee is used for calculating financial statistics for any ConsultationRecord objects.
4.6.2. Querying statistics
The statistics command is started through the command stats START_MMYYYY [END_MMYYYY].
The two MMYYYY corresponds to a range of dates. The end range is optional,
and is defaulted to the start range by the StatisticsCommandParser if it does not exist.
The start date is not allowed to be before January 2019, and the end date cannot be before the start date. Hence,
QuickDocs currently does not support adding old records before January 2019 due to the implementation of the
StatisticsManager. This will be explained in the section below.
|
MMYYYY is a string, e.g. "012019", which stands for January 2019. It is parsed by StatisticsCommandParser into a
YearMonth object. |
4.6.3. Statistics and Record - Current Implementation
The statistics class stores 6 types of information:
-
Number of consultations
-
Medicines prescribed
-
Symptoms diagnosed
-
Revenue
-
Expenditure
-
Profit
Number of consultations is stored as an int, while the financial variables are stored using BigDecimals. The number of
medicines prescribed and symptoms diagnosed are stored by using a HashMap.
| Implementation of additional statistics will be done through adding additional relevant variable fields. |
The implementation of Statistics and Record has 3 parts:
-
Creation of the Record
-
Adding the Record
-
Retrieving the Statistics
1. Creation of the Record
In order for the statistics to be keep tracked of, Record objects are used to retrieve information that the
StatisticsManager will make use of. The Record class is an abstract class that only has 1 abstract method,
toStatistics(StatisticsManager sm), which will generate a Statistics object.
Each child class of Record is for a specific operation in QuickDocs, where the implementation
toStatistics(StatisticsManager sm) will generate a Statistics object that stores relevant information pertaining to
that specific operation. The StatisticsManager is passed in to retrieve the any variable that the Record might require
to calculate the statistics, e.g., ConsultationRecord requires the consultationFee variable in StatisticsManager.
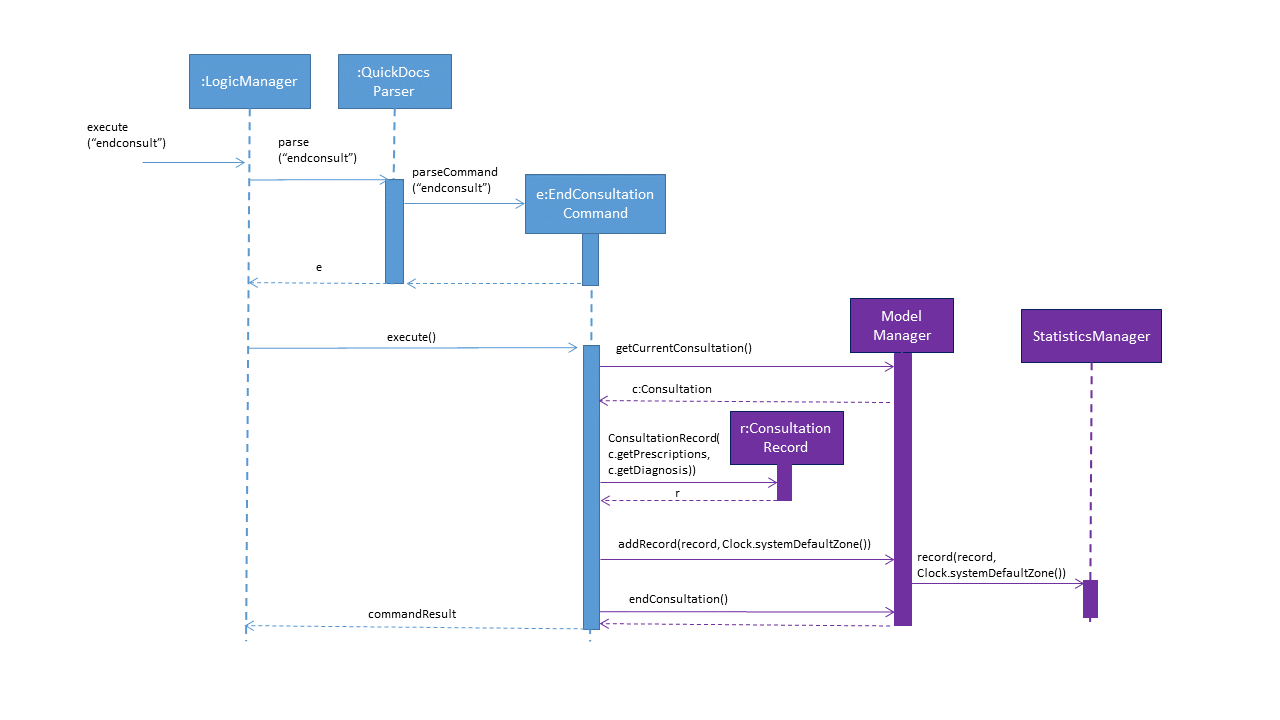
Currently, there are only 2 child classes of Record, ConsultationRecord and MedicinePurchaseRecord. ConsultationRecords
are created when the a consultation session ends from the EndConsultCommand, while MedicinePurchaseRecord are created
when a medicine is purchased via the PurchaseMedicineCommand. The commands will create the Record, and call ModelManager’s
addRecord(record, clock) function, which will then result in ModelManager calling StatisticsManager’s record(record, clock)
function. The clock used is the system clock, to retrieve the current YearMonth of the Record created. The sequence diagram
below illustrates an example ConsultationRecord being created.
2. Adding the record
The StatisticsManager holds an ArrayList of MonthStatistics, where a MonthStatistics object contains the YearMonth, and the Statistics object of that YearMonth. Each MonthStatistics object will be initialised with the zero Statistics object, where all the variables are 0 or contains no elements (not null). The ArrayList starts with a MonthStatistics with the YearMonth 2019 January, and every subsequent index will contain the MonthStatistics with the subsequent month, e.g., the 4th index contains the MonthStatistics with YearMonth 2019 May.
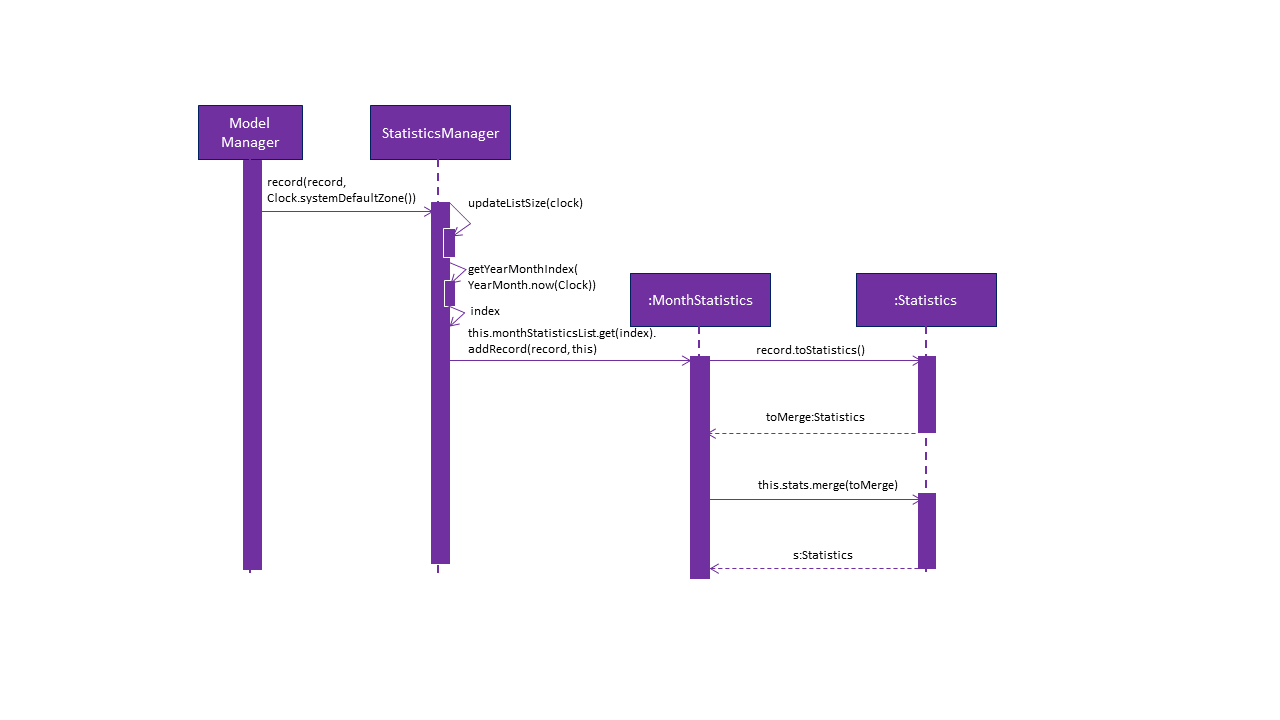
When the StatisticsManager adds a new Record by the record(record, clock) function, it will first retrieve the
YearMonth from the clock variable passed in. Next, it will update the size of the ArrayList by calling its own method
updateListSize(clock), which is a wrapper for updateListSize(YearMonth). Afterwards, StatisticsManager will find the
correct index of the MonthStatistics ArrayList to add the record in. In the current implementation, the record is not
actually stored. Instead, the record will be converted to a Statistics object which is then merged with the
MonthStatistics’s own Statistics object. The MonthStatistics’s Statistics object will then be reassigned with the newly
merged Statistics object. The sequence diagram below illustrates an example ConsultationRecord being added.
3. Retrieving the Statistics
When the StatisticsCommand queries for the statistics for a range
of months, Logic will call the ModelManager’s getStatistics(FROM_YEARMONTH, TO_YEARMONTH), which then calls
StatisticsManager’s getStatistics(FROM_YEARMONTH, TO_YEARMONTH). StatisticsManager will convert the YearMonth objects to
their respective indexes with the StatisticsManager’s getYearMonthIndex(YearMonth) function.
StatisticsManager will then obtain the statistics for each of the queried months, and merge them together into a new Statistics object. StatisticsManager will then return the Statistics back to the ModelManager, which would then return it to the StatisticsCommand, which would then return the CommandResult with the statistics converted to a String to the LogicManager.
4.6.4. Statistics and Record - Design considerations
-
The statistics are stored in months as the design only allows the doctor to query within a minimum timespan of 1 month. Hence, it was decided that the statistics to be stored in months in a chronological order with an ArrayList for ease of retrieval.
-
Currently, as QuickDOcs is developed in 2019, and there are no plans to allow the doctor to add in past records, the first index in the array of MonthStatistics is allocated to January 2019. Any MMYYYY value before 012019 will not be allowed.
-
The MonthStatistics objects are stored in an ArrayList as it might be desirable for a MonthStatistics with the zero statistics to exist (all variables 0 or no elements). Such a case might happen when the doctor goes on vacation for the whole month. In addition, it would be easy to retrieve the MonthStatistics object of a specific MMYYYY by indexing.
4.6.5. Statistics and Record - Alternatives Considered
The following table lists out the alternatives designs considered for implementing the storage of the Records and Statistics.
| Alternative | Description | Pros | Cons |
|---|---|---|---|
Storing of individual records for each month (Alternative chosen) |
Individual records are stored within the MonthStatistics, along with the Statistics. When the Statistics for a specific month is queried, update the latest statistics and return it. |
Individual records are kept, which could potentially be used for other calculations or features. |
Storing of individual records is extremely costly in terms of space |
Storing the merged statistics of all the records for each month |
When a new record is added, it is coverted to a Statistics object which is then merged with the current Statistics object stored. |
Only one Statistics object needs to be stored, which saves a lot of storage space. |
The individual records are unable to be retrieved. However, the current implementation has no need to retrieve individual records. |
4.7. Storing medicines in inventory
One essential aspect of clinic management is about managing medicine storage of the clinic. QuickDocs' medicine management module supports customized medicine organization via a browser-like directory format.
4.7.1. Current implementation
The current implementation takes a similar form as the Windows file browser. The user is free to determine for himself/herself how he/she wants the medicines to be arranged.
Code: MedicineManager.java
To organize the inventory, the following methods in MedicineManager are used:
-
addDirectory(new directory’s name, path of parent directory)— Adds a new directory with the given name to the parent directory corresponding to the path. -
addMedicine(name, quantity, path of parent directory, price)— Adds a new Medicine with given name, quantity and price to the parent directory corresponding to the path given. -
addExistingMedicineToDirectory(medicine, path of parent directory)— Assuming the medicine already exists, add a reference of this medicine under the directory corresponding to the path.
| The current implementation does not allow multiple medicines with the same to exist simultaneously. However, one medicine could be placed in multiple directories. |
| Both directories and medicines' names are case-insensitive. |
From the initial empty state of the storage, the users could arrange their storage in these following ways:
-
The initial empty storage consists of an empty directory named as "root". The user can then add directories and medicines into the storage.
-
The
MedicineManagerkeeps a list of sorted unique medicine in the inventory. -
The user could add a new directory via
adddireccommand by specifying the path of the directory he/she wants to add into and the name of new directory. -
The user could add new/existing medicine to a specific directory via the "addMed" command.
-
1. If there already exists a medicine with the same name in the storage, and the quantity and price is not specified in the command arguments, the existing medicine will be placed in the directory specified.
-
2. Otherwise, a new medicine with the specified name, quantity and price will be created and added to the specified directory.
-
Given below is an example of organizing medicine from an initial empty QuickDocs.
Step 1: Initially, the storage only consists of an empty directory called root.
The list of unique medicine in MedicineManager is empty.

Step 2: Via adddirec root Internal, a new directory called "Internal" is added under root.
The list of unique medicine is still empty.

Step 3: Via a few more adddirec commands, the figure below is an illustration of a sample inventory’s framework.
The list of unique medicine is still empty.

Step 4: Now the user can add new medicines into the storage via addmed root\Internal\General paracetamol p/40 q/50.
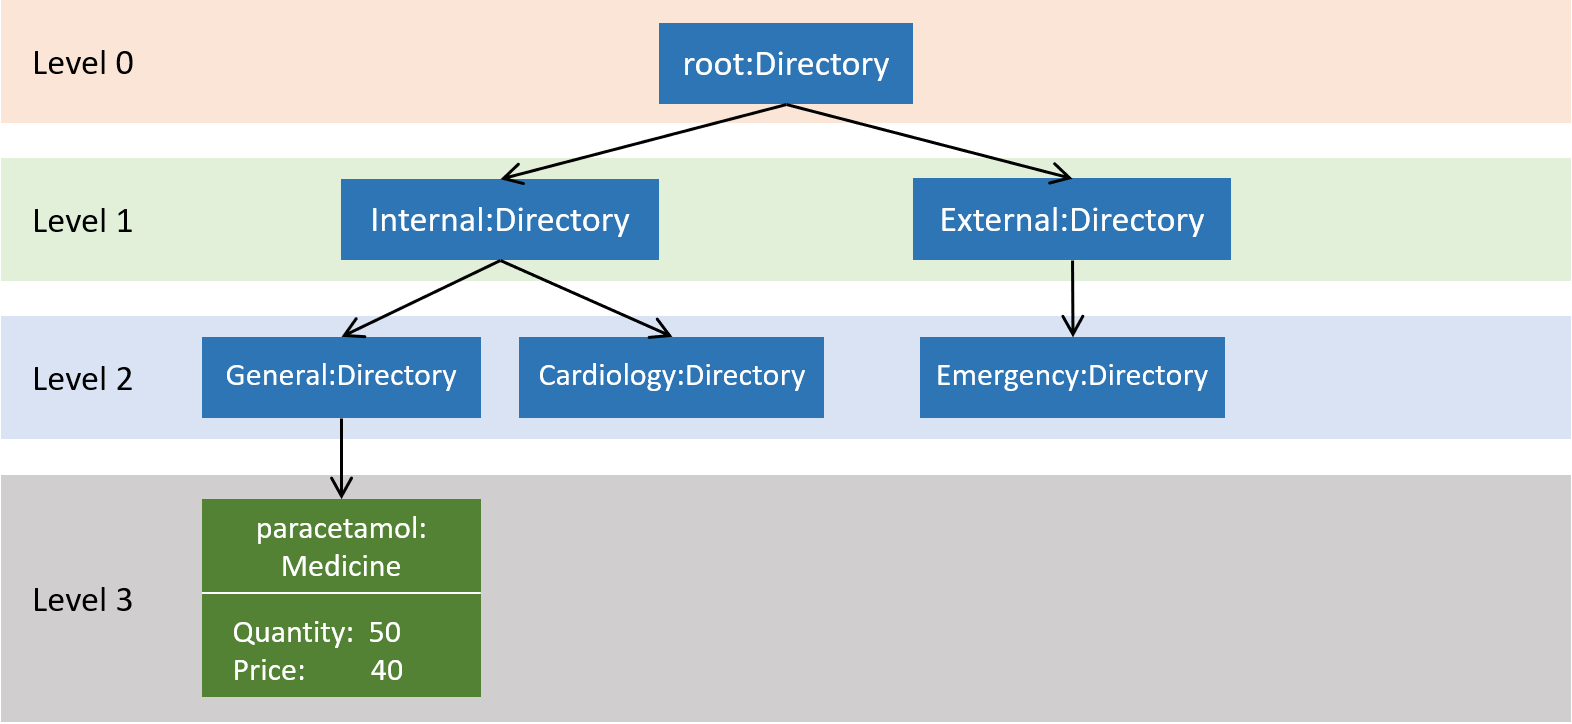
The list of unique medicine is also updated.

Step 5: Via a few more addmed commands, some more new medicines are added to the inventory. The following figure shows the result after that
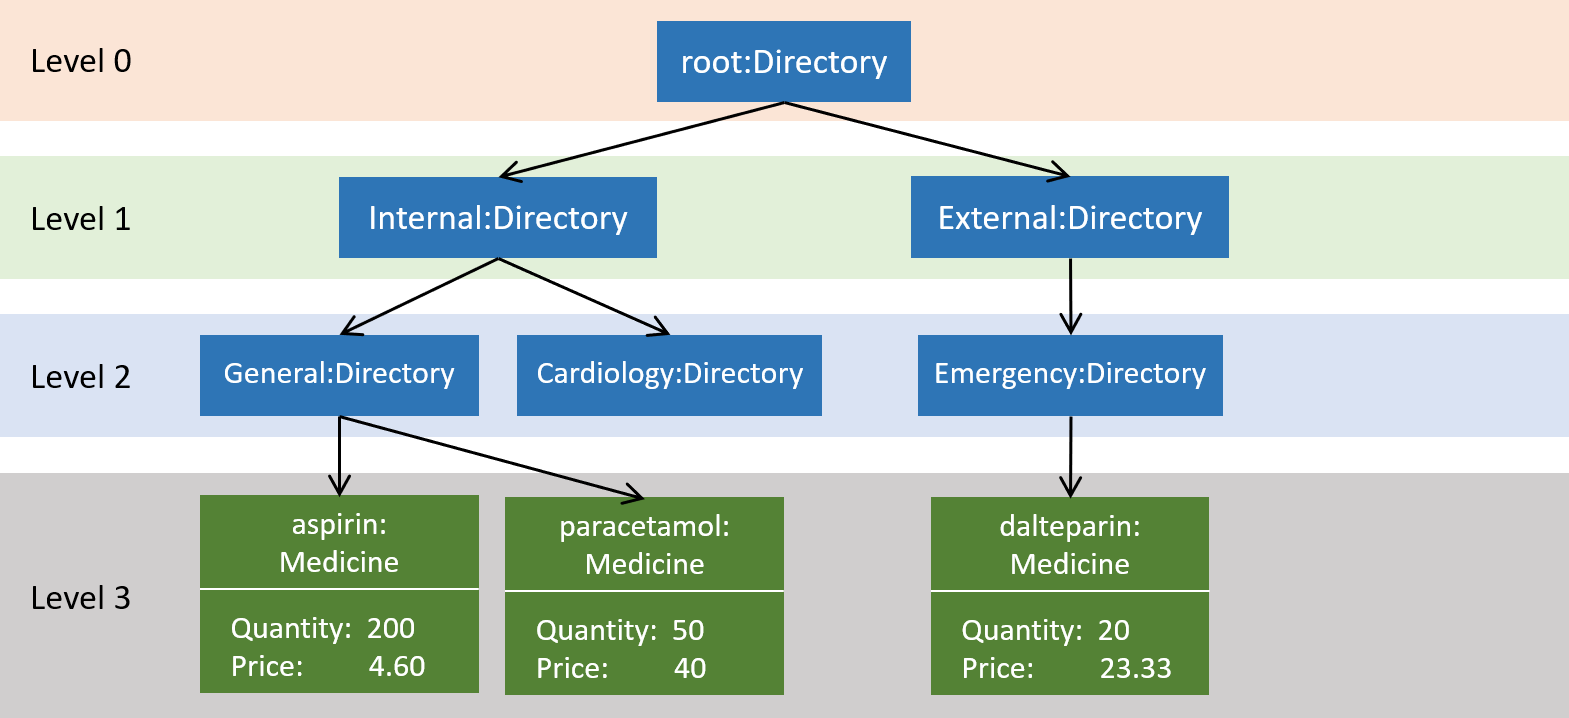
The list of unique medicine is also updated.

Step 6: Now, the user found out that aspirin can also be used to treat high blood pressure and decides to put it under "Cardiology" as well.
Via the addmed root\Internal\Cardiology aspirin, a reference to the existing aspirin medicine will be placed under the "Cardiology" directory.
The figure below shows the result of this command.
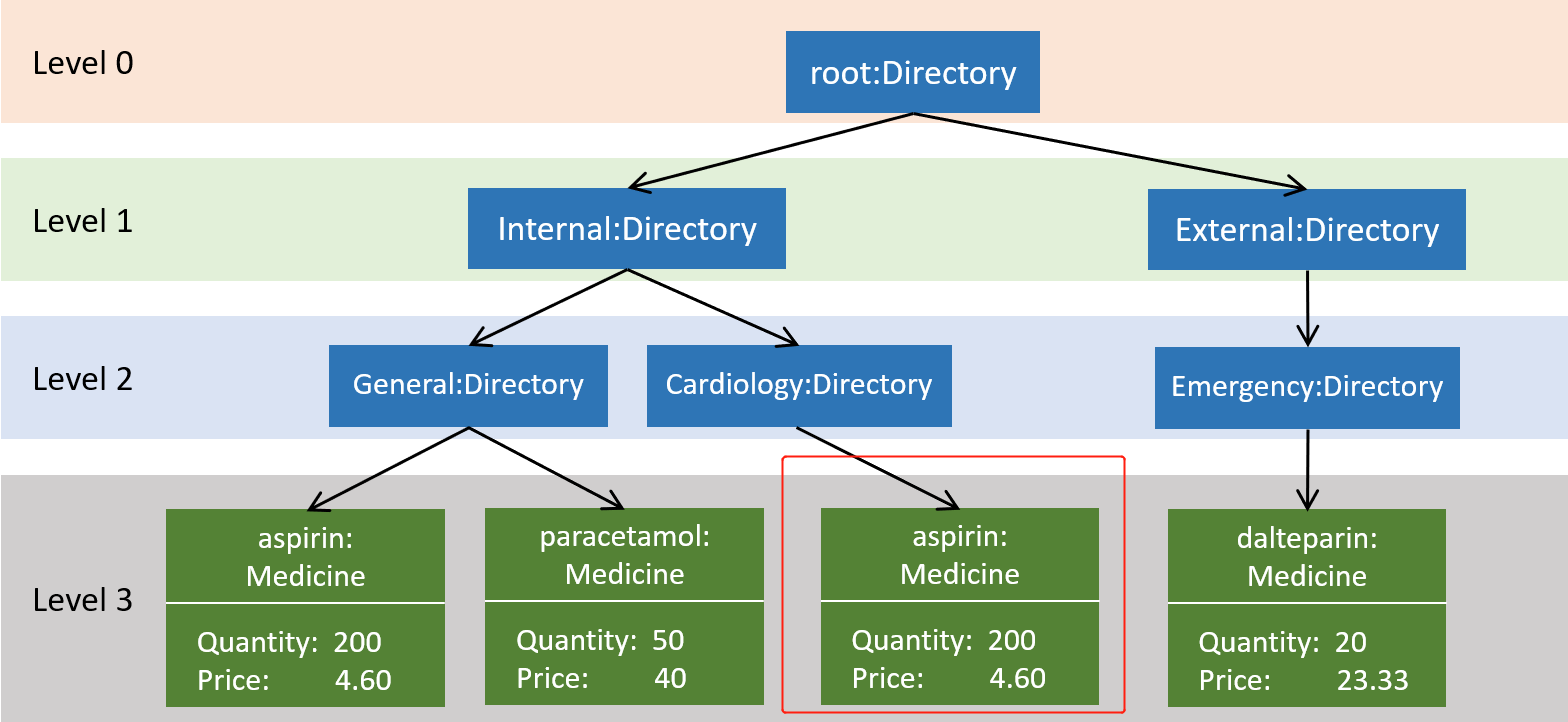
However, the list of unique medicine is not changed, as now new medicine is added.

This six-step example illustrates the basic implementation of how medicines and directories are organized in QuickDocs.
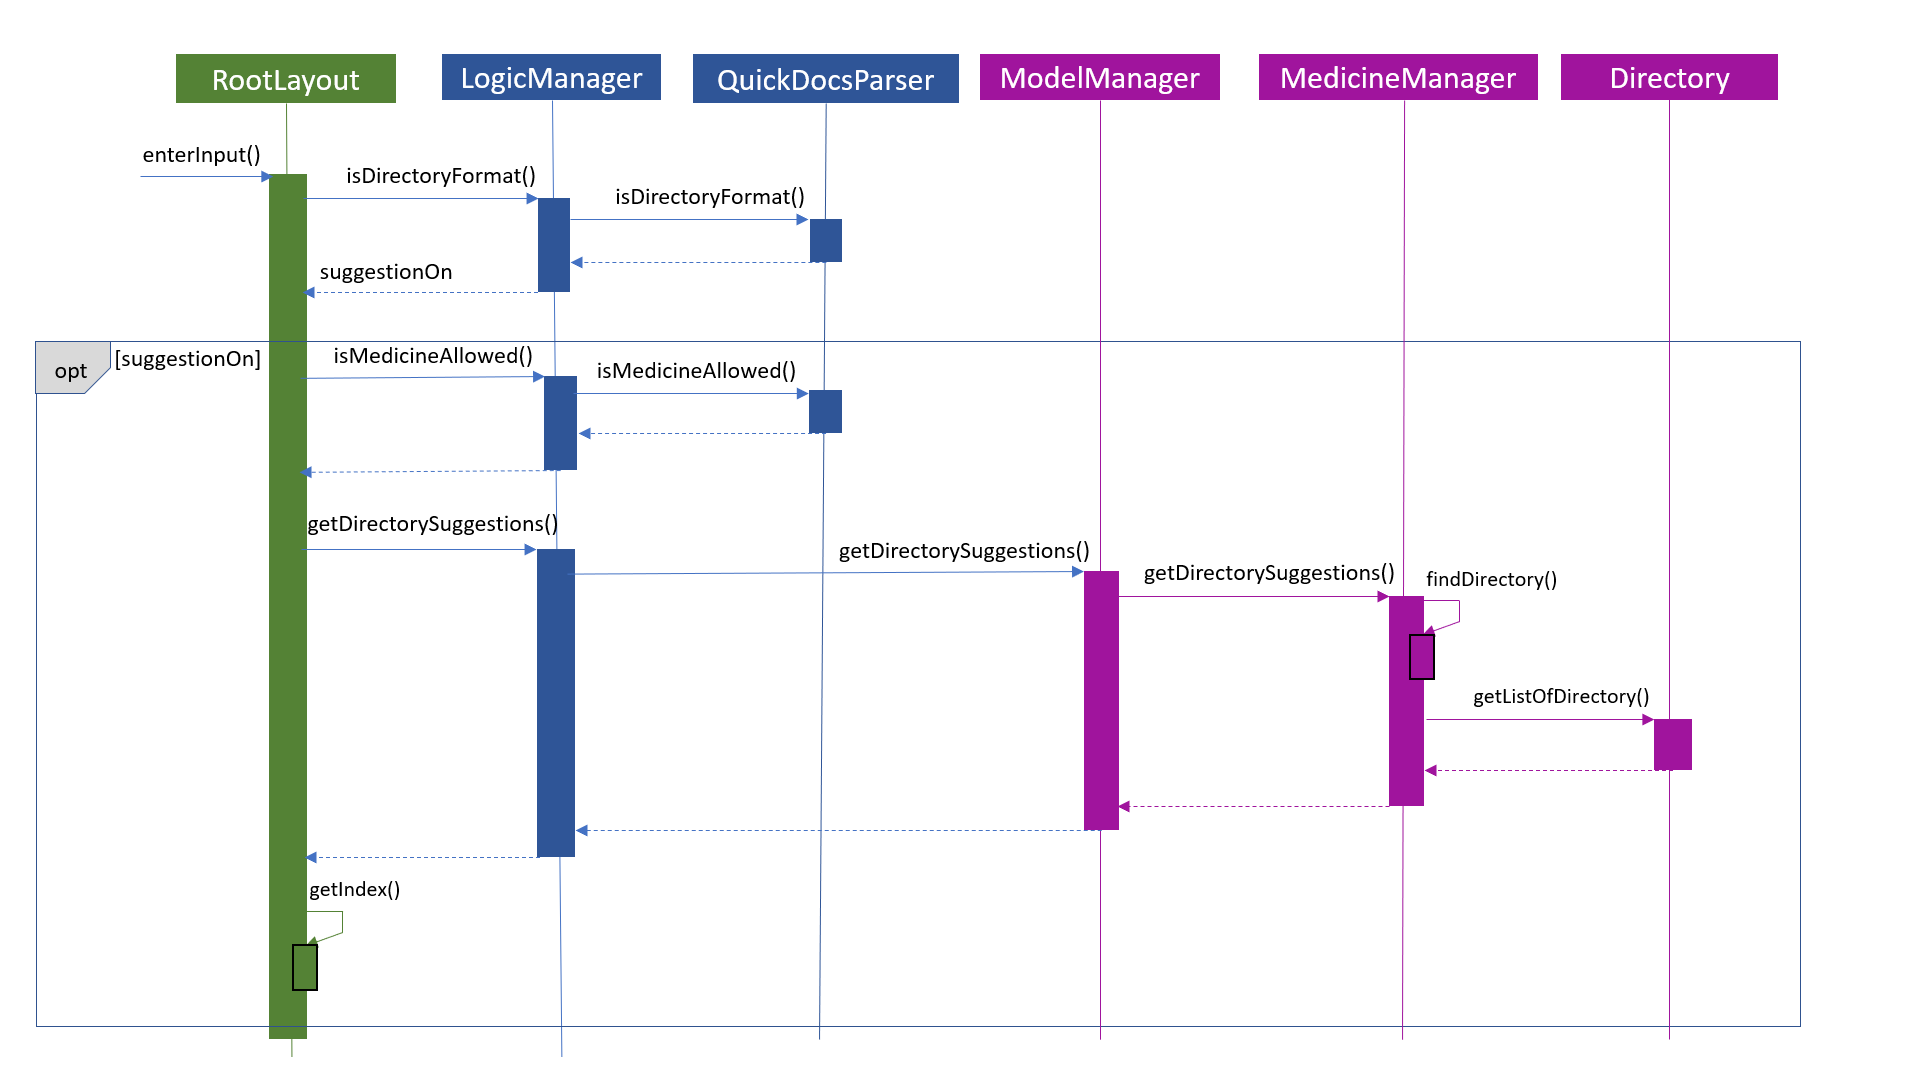
When typing the directory path in the command box in the ui, QuickDocs supports intelligent suggestions about the next field.
After the user entered at least one \ character to indicate he is inputting a path, the suggestion mode will be turned on.
The user could press Page Up / Page Down bottom to iterate to the previous or the next valid name of sub-directory or medicine in alphabetical order, given that the path given before the previous \ character is valid.
Using the above sample inventory as an example:
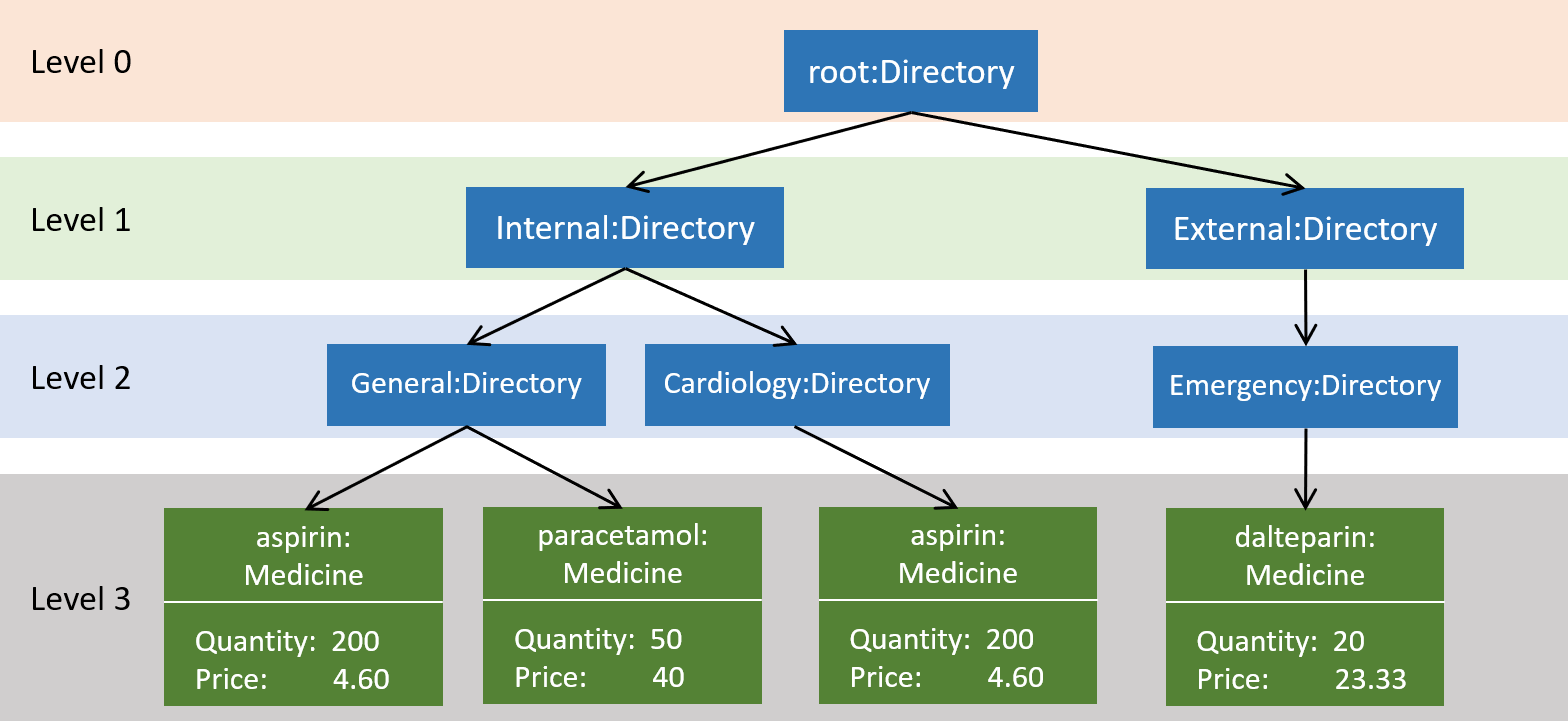
-
When the user types in
addmed root\, the suggestion mode is turned on. -
The user may not want to type in the full name of the directories, so when he types in
addmed root\in, he could then press Page Down to iterate to the next valid name in alphabetical order, which is "Internal". -
The command box is then automatically filled with
addmed root\Internal -
Similarly, if the user decides to traverse to the previous valid name, he could do so by press Page Up. And the command box will automatically be filled with
addmed root\External.
The figure below illustrates how this feature is implemented to make user’s life more convenient.
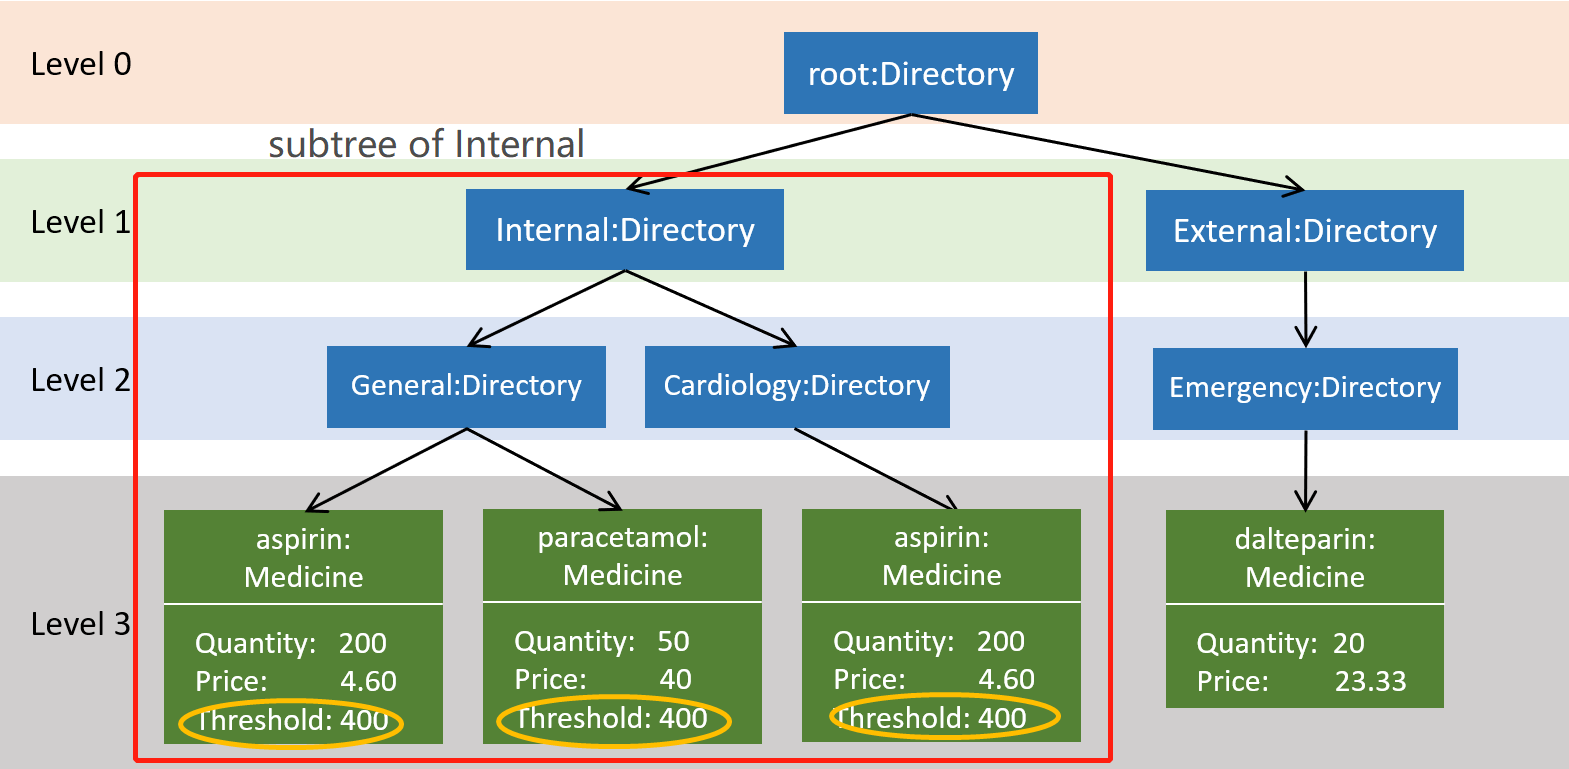
QuickDocs also supports setting alarm level for medicines. Every time a medicine’s storage falls below the designated level, a reminder is thrown.
To convenient the users, QuickDocs allow not only threshold setting for individual medicines, but also threshold setting for directories.
Taking the above sample inventory as an example:

Setting a threshold for a directory is effectively the same as setting the threshold for every medicine in the "subtree" of that directory. This is down by a tree-like traversal.
For example, alarm root\Internal 400 command sets the alarm level of all medicine in the subtree of "Internal" directory to 400.
4.7.2. Design consideration
-
The current implementation takes into consideration that the users may wish to have some freedom in determining the arrangement of medicine.
-
When prescribing medicines, a directory system that step by step leads to the desired medicine is to the convenience of the user.
-
By arranging the medicine by folders, it is then possible to support massive manipulation of medicine by directories.
-
Additionally, it is impossible to expect the doctor to always remember the full name of medicines correctly. There is a need for an easier way to identify medicines to operate on besides requiring the user to type in full names every time.
-
Considering that even a small private clinic may have a considerably large set of medicine available in their storage, massive operation on a large set of medicine should be made possible besides operations on single medicine.
4.7.3. Alternatives considered
The table illustrates some of the alternatives I considered during development of this medicine module, the relative advantages they have over the current implementation, and why they are not selected at the end.
| Alternative | Description | Comparative advantages | Reasons for not adopting |
|---|---|---|---|
Store medicines as a simple ArrayList |
When users add a new medicine, just append a new medicine to the ArrayList. During operations on medicines, use name of medicine as a key to select the wanted medicine. |
|
|
Use a hash map to store the medicines |
Use medicine name as the key and the medicine as the value. Search for the key to identify and operate on medicines. |
|
|
Store medicines in a list with tags |
When adding medicines, require tags from the users so that searching and identifying medicine is easier. |
|
|
Since QuickDocs aims to provide the most convenient experience given a large set of medicine in a clinic inventory, the medicine management module needs to provide a model that makes both typing commands, identifying the correct medicine and massive operation possible.
Combined with the suggestion mode, the current design is the best way to implement all of the three.
4.8. Logging
We are using java.util.logging package for logging. The LogsCenter class is used to manage the logging levels and logging destinations.
-
The logging level can be controlled using the
logLevelsetting in the configuration file (See Section 4.9, “Configuration”) -
The
Loggerfor a class can be obtained usingLogsCenter.getLogger(Class)which will log messages according to the specified logging level -
Currently log messages are output through:
Consoleand to a.logfile.
Logging Levels
-
SEVERE: Critical problem detected which may possibly cause the termination of the application -
WARNING: Can continue, but with caution -
INFO: Information showing the noteworthy actions by the App -
FINE: Details that is not usually noteworthy but may be useful in debugging e.g. print the actual list instead of just its size
4.9. Configuration
Certain properties of the application can be controlled (e.g user prefs file location, logging level) through the configuration file (default: config.json).
5. Documentation
We use asciidoc for writing documentation.
| We chose asciidoc over Markdown because asciidoc, although a bit more complex than Markdown, provides more flexibility in formatting. |
5.1. Editing Documentation
See UsingGradle.adoc to learn how to render .adoc files locally to preview the end result of your edits.
Alternatively, you can download the AsciiDoc plugin for IntelliJ, which allows you to preview the changes you have made to your .adoc files in real-time.
5.2. Publishing Documentation
See UsingTravis.adoc to learn how to deploy GitHub Pages using Travis.
5.3. Converting Documentation to PDF format
We use Google Chrome for converting documentation to PDF format, as Chrome’s PDF engine preserves hyperlinks used in webpages.
Here are the steps to convert the project documentation files to PDF format.
-
Follow the instructions in UsingGradle.adoc to convert the AsciiDoc files in the
docs/directory to HTML format. -
Go to your generated HTML files in the
build/docsfolder, right click on them and selectOpen with→Google Chrome. -
Within Chrome, click on the
Printoption in Chrome’s menu. -
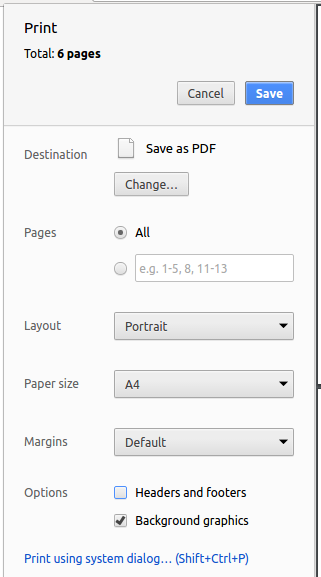
Set the destination to
Save as PDF, then clickSaveto save a copy of the file in PDF format. For best results, use the settings indicated in the screenshot below.
5.4. Site-wide Documentation Settings
The build.gradle file specifies some project-specific asciidoc attributes which affects how all documentation files within this project are rendered.
Attributes left unset in the build.gradle file will use their default value, if any.
|
| Attribute name | Description | Default value |
|---|---|---|
|
The name of the website. If set, the name will be displayed near the top of the page. |
not set |
|
URL to the site’s repository on GitHub. Setting this will add a "View on GitHub" link in the navigation bar. |
not set |
|
Define this attribute if the project is an official SE-EDU project. This will render the SE-EDU navigation bar at the top of the page, and add some SE-EDU-specific navigation items. |
not set |
5.5. Per-file Documentation Settings
Each .adoc file may also specify some file-specific asciidoc attributes which affects how the file is rendered.
Asciidoctor’s built-in attributes may be specified and used as well.
Attributes left unset in .adoc files will use their default value, if any.
|
| Attribute name | Description | Default value |
|---|---|---|
|
Site section that the document belongs to.
This will cause the associated item in the navigation bar to be highlighted.
One of: * Official SE-EDU projects only |
not set |
|
Set this attribute to remove the site navigation bar. |
not set |
5.6. Site Template
The files in docs/stylesheets are the CSS stylesheets of the site.
You can modify them to change some properties of the site’s design.
The files in docs/templates controls the rendering of .adoc files into HTML5.
These template files are written in a mixture of Ruby and Slim.
|
Modifying the template files in |
6. Testing
6.1. Running Tests
There are three ways to run tests.
| The most reliable way to run tests is the 3rd one. The first two methods might fail some GUI tests due to platform/resolution-specific idiosyncrasies. |
Method 1: Using IntelliJ JUnit test runner
-
To run all tests, right-click on the
src/test/javafolder and chooseRun 'All Tests' -
To run a subset of tests, you can right-click on a test package, test class, or a test and choose
Run 'ABC'
Method 2: Using Gradle
-
Open a console and run the command
gradlew clean allTests(Mac/Linux:./gradlew clean allTests)
| See UsingGradle.adoc for more info on how to run tests using Gradle. |
Method 3: Using Gradle (headless)
Thanks to the TestFX library we use, our GUI tests can be run in the headless mode. In the headless mode, GUI tests do not show up on the screen. That means the developer can do other things on the Computer while the tests are running.
To run tests in headless mode, open a console and run the command gradlew clean headless allTests (Mac/Linux: ./gradlew clean headless allTests)
6.2. Types of tests
We have two types of tests:
-
GUI Tests - These are tests involving the GUI. They include,
-
System Tests that test the entire App by simulating user actions on the GUI. These are in the
systemtestspackage. -
Unit tests that test the individual components. These are in
quickdocs.uipackage.
-
-
Non-GUI Tests - These are tests not involving the GUI. They include,
-
Unit tests targeting the lowest level methods/classes.
e.g.quickdocs.model.PatientTest -
Integration tests that are checking the integration of multiple code units (those code units are assumed to be working).
e.g.StorageManagerTest -
Hybrids of unit and integration tests. These test are checking multiple code units as well as how the are connected together.
e.g.LogicManagerTest
-
7. Dev Ops
7.1. Build Automation
See UsingGradle.adoc to learn how to use Gradle for build automation.
7.2. Continuous Integration
We use Travis CI and AppVeyor to perform Continuous Integration on our projects. See UsingTravis.adoc and UsingAppVeyor.adoc for more details.
7.3. Coverage Reporting
We use Coveralls to track the code coverage of our projects. See UsingCoveralls.adoc for more details.
7.4. Documentation Previews
When a pull request has changes to asciidoc files, you can use Netlify to see a preview of how the HTML version of those asciidoc files will look like when the pull request is merged. See UsingNetlify.adoc for more details.
7.5. Making a Release
Here are the steps to create a new release.
-
Update the version number in
MainApp.java. -
Generate a JAR file using Gradle.
-
Tag the repo with the version number. e.g.
v0.1 -
Create a new release using GitHub and upload the JAR file you created.
Appendix A: Product Scope
Target user profile:
-
doctors operating small neighbourhood clinics in Singapore
-
have minimal assistants or employees to assist with tasks
-
handle the majority of the clinic’s operations themselves
-
prefer desktop apps over other types
-
can type fast
-
prefers typing over mouse input
-
is reasonably comfortable using CLI apps
Value proposition: allow doctors to accomplish greater management of their clinics with minimal manpower more conveniently.
Appendix B: User Stories
Priorities: High (must have) - * * *, Medium (nice to have) - * *, Low (unlikely to have) - *
| Priority | As a … | I want to … | So that I can… |
|---|---|---|---|
|
doctor |
allocate appointments for patients |
Prevent clashes in schedules |
|
doctor |
view patient’s contact details |
Call and follow up on them |
|
doctor |
record patient particulars |
register new walk-in patients to start a consultation session |
|
doctor |
record and view patients past medical records |
diagnose them better for current and subsequent consultations |
|
doctor |
view the available time slots quickly |
reserve an appointment slot for my patients requiring long term care. |
|
doctor |
view monthly statistics about patients, finances and inventory |
make better decisions on how to run my clinic |
|
forgetful or busy doctor |
get reminders of when I am expecting patients |
prepare to diagnose them |
|
busy doctor |
get reminders whe my medicine is running low |
refill my medicine and prevent shortages during prescriptions |
|
doctor |
view my patients’ appointment details |
send reminders to them |
|
doctor handling patients with chronic illnesses |
view detailed information about medicine in my storage |
give out prescription that tackles the patients’ symptoms better |
|
doctor |
encrypt the patient and medical data |
Protect sensitive information like medical history from getting stolen |
|
doctor |
find out the most common symptom diagnosed |
prepare enough medicine to deal with seasonal illnesses |
|
doctor |
export patient diagnosis and details |
facilitate external providers’ medical care |
|
doctor |
lock the application |
Prevent unauthorised accesses to the application |
|
forgetful doctor |
keep track of my medical license duration |
renew it on time |
|
newly trained doctor |
search for details of a medical condition |
explain to my patients better |
Appendix C: Use Cases
(For all use cases below, the System is Quickdocs and the Actor is the doctor, unless specified otherwise)
Use case: Consultation
MSS
-
User enter consultation command followed by NRIC
-
Quickdocs show prompt that indicates to user that consultation for that patient started
-
User enter diagnosis command with symptoms and assessment
-
Quickdocs indicate to user that the symptoms and assessment are recorded
-
User enter prescription command with medicine and quantity
-
Quickdocs indicate to user the medicine and quantity to be administered for current patient
-
User enter end consultation command
-
Quickdocs indicate that consultation for current patient ended
Use case ends.
Extensions
-
1a. User enter invalid NRIC
-
1a1. Quickdocs alert user that no patient with entered NRIC exist to start a consultation session with
Use case ends here.
-
-
3a. User left out symptoms or assessment when diagnosis patient
-
3a1. Quickdocs alert user that some details are left out and prompt user to modify command
Use case resumes from step 3.
-
-
5a. User left out quantities for certain medicine
-
5a1. Quickdocs alert user that some medicine do not have quantities and prompt them to reenter command
Use case resumes from step 5.
-
-
5b. User left out quantities for certain medicine
-
5b1. Quickdocs alert user that additional quantities are provided and prompt user to reenter command
Use case resumes from step 5.
-
-
7a. User end consultation when diagnosis is not completed
-
7a1. Quickdocs alert user that the session is missing a diagnosis
-
7a2. User will resume perform step 3 and 4 since they were skipped
Use case ends here.
-
-
7b. User end consultation when prescription is not given
-
7b1. Quickdocs alert user that the session is missing a prescription
-
7b2. User will resume perform step 5 and 6 since they were skipped
Use case ends here.
-
Use case: View patient medical record
MSS
-
User enter command to view patient history with search criteria
-
Quickdocs show list of patient’s consultation records
-
Quickdocs prompt user to enter index
-
User enter index of record he or she wants to see
-
Quickdocs show selected patient record
-
User enters end to stop looking at record
-
Use case repeat from case 2 until user enters “end” again after step 6
-
Quickdocs shows message to inform user he or she is no longer looking at patient records
Use case ends.
Extensions
-
1a. User enter invalid index
-
1a1. Quickdocs alert user that the index is invalid
-
1a2. Quickdocs exit view patients record
Use case ends here.
-
-
1b. No patient record created yet
-
1b2. Quickdocs alert user that no patient is created yet, suggest to create a new patient record first
Use case ends.
-
-
1c. User enter a patient’s name that is unique in the storage
Use case resumes from step 1.
-
1d. User enter a non unique patient’s name
-
1d1. Quickdocs show list of patients with the same name, and prompt index
-
1d2. User refine search criteria, either by entering index or full name of the patient
Use case resumes from step 1.
-
-
4a. User enter invalid medical record index
-
4a1. Quickdocs alert user that index entered was invalid
Use case resumes from step 3.
-
-
6a. User enter command apart from “end”
-
Quickdocs prompt user that command was invalid and inform them that “end” will exit view
Use case resumes from step 5.
-
Use case: Allocating an appointment slot
MSS
-
User enter command to list all free slots, specifying the date and viewing format
-
User discusses and agrees on an appointment slot with patient
-
User search for patient’s NRIC by viewing patient records with search criteria
-
User enter command to add appointment slot, specifying patient’s NRIC, date, start and end time
-
Quickdocs displays a successful message, showing the details of the newly created appointment slot
Use case ends
Extensions
-
1a. User enters invalid keyword when specifying date or format
-
1a1. Quickdocs displays an error message
Use case resumes from step 1.
-
-
1b. User does not enter any keywords
-
1b1. Quickdocs displays all free slots for the current week
Use case resumes from step 2.
-
-
4a. User enters invalid NRIC, date or time
-
4a1. Quickdocs displays an error message
Use case resumes from step 4.
-
-
5b. Quickdocs displays an error message, showing clashes in timing with another appointment slot
Use case resumes from step 4.
-
5b. Patient wants to change appointment slot timing
-
5b1. User enter command to delete appointment slot, specifying date and start time
-
5b2. Appointment specified deleted
Use case resumes from step 1.
-
Use case: Viewing clinic statistics
MSS
-
User requests to view statistics, specifying the start and end YearMonths
-
Quickdocs displays the statistics
Use case ends.
Extensions
-
1a. User requests to view statistics with valid arguments.
Use case resumes at step 2.
-
1b. User requests to view statistics with invalid arguments.
-
1b1. Quickdocs shows an error message.
Use case ends.
-
Use case: Setting alarm threshold for medicines
MSS
-
User enters "alarm" and the path to the interested medicine and the desired alarm quantity.
-
QuickDcos set the threshold for the medicine accordingly.
-
QuickDocs refreshes the reminder sidebar if needed.
Use case ends.
Extensions
-
1a. User types in a path leading to a directory.
-
2a. All medicines under the subtree of that directory is set to the desired quantity.
Use case resumes at step 3.
Appendix D: Non Functional Requirements
-
Should work on any mainstream OS as long as it has Java
9or higher installed. -
Should be able to hold up to 1000 patients and their consultation records without a noticeable sluggishness in performance for typical usage.
-
A user with above average typing speed for regular English text (i.e. not code, not system admin commands) should be able to accomplish most of the tasks faster using commands than using the mouse.
-
Response time for commands should be below 3 seconds so that clinical operations can be expedited
-
Commands should be easy to pick up for novice users, they can remember it more quickly and start using them immediately
-
Commands should be made convenient for expert users as well
-
Data stored can be easily transferred to another device installed with Quickdocs for operation continuation.
-
Data stored, especially patient records and particulars, need to be encrypted to prevent unauthorised access and misuse.
Appendix E: Glossary
- Mainstream OS
-
Windows, Linux, Unix, OS-X
- Private contact detail
-
A contact detail that is not meant to be shared with others
- Patient Records
-
A data entry consisting of a patient’s particulars, which includes name, NRIC, email address, home address, gender, contact number, date of birth and the list tags assigned to him or her.
- Consultation Records
-
A data entry consisting of the diagnosis given and medicine prescribed for a single patient during a consultation session with the doctor.
Appendix F: Instructions for Manual Testing
Given below are instructions to test the app manually.
| These instructions only provide a starting point for testers to work on; testers are expected to do more exploratory testing. |
F.1. Adding patient records
-
Add a new patient record
-
Prerequisites: patient to be added must not have the same NRIC as an existing patient’s NRIC, the
listpatcommand can be used to check if there are conflicting NRIC -
Test case 1:
addpat n/Mohd Hamiru Bin Hamza r/S9876543C a/1 Tampines Street e/mhbh@gmail.com c/92344321 g/M d/1998-07-06
Expected: Patient with name "Mohd Hamiru Bin Hamza" with NRIC S9876542C added -
Test case 2:
add n/Nurul Huda Binte Hamza r/S9876543C a/3 Tampines Street e/nhbh@gmail.com c/93124432 g/F d/1998-11-02
Expected: Patient will not be added, an error message will be shown to indicate that a patient with the same NRIC existed in the records -
Other incorrect
addpatcommands to try:addpatwith missing parameters such as gender and date of birth,addpatwith name containing of symbols,addpatwith invalid NRIC values (8 numbers or invalid last letters).
-
F.2. Editing patient records
-
Edit the fields of an existing patient record
-
Prerequisites: use the
listpatcommand to check for existing patients to be edited, or simply add one usingaddpatif there isn’t any. You need at least 2 patients to perform this manual test. -
Test case1:
editPat EXISTING_NRIC n/Peter Tan g/M d/1990-09-01
Expected: selected patient will have his or her name changed to "Peter Tan", gender changed to "M" and date of birth changed to 1990-09-01. -
Test case2:
editPat EXISTING_NRIC n/Perry Tan r/ANOTHER_EXISTING_NRIC
Expected: An error message will be shown to indicate that the edit to the current patient will cause it to have a conflicting NRIC with another patient’s NRIC -
Test case 3:
editPat EXISTING_NRIC
Expected: An error message will be shown to indicate that there is nothing to edit for the current selected patient -
Other incorrect
editpatcommands to try: name with numbers,editpatwith a non existent NRIC,editPatwithout an NRIC (without prefix)
-
F.3. Starting a consultation
-
Start a consultation for a registered patient
-
Prerequisites: Existing patients must already be stored in QuickDocs, use
listpatto check for both existing and non existing patients' NRIC -
Test case 1:
consult r/EXISTING_NRIC
Expected: A message to indicate the start of the consultation session will be shown at the main display. A label will be displayed at the bottom right, displaying the message along with the patient’s NRIC as well. -
Test case 2: After test case 1, enter
consult r/ANOTHER_EXISTING_NRIC
Expected: An error message will be shown to alert you that there is already an ongoing consultation session. -
Test case 3: exit QuickDocs, and then enter
consult r/NON_EXISTING_NRIC
Expected: since there are no patients with the NRIC, an error message will be shown to indicate that the consultation session cannot start for a non-existing patient
-
F.4. Ending a consultation
-
End a consultation session after providing the prescription and diagnosis. A consultation session can only end after both the diagnosis and prescription have been recorded.
-
Prerequisites: consultation session must already been started for a patient, medicine to be assigned for prescription is already stored in QuickDocs
-
Test case 1: after starting a consultation,
endconsultimmediately
Expected: Error message will be shown to alert you that a diagnosis have not been provided. -
Test case 2: add the diagnosis and then
endconsultafter test case 1
Expected: Error message will be shown to alert you that a prescription have not been given to end the consultation session. -
Test case 3: add the prescription and then
endconsultafter test case 2
Expected: A message indicating that the current consultation session have ended. The ongoing session label at the bottom right of QuickDocs is also removed.
-
F.5. Adding and removing an appointment
-
Add an appointment for a registered patient
-
Prerequisites:
-
Appointment you are adding must not have conflicting timing with other existing appointments. You can use the
freeappcommand to find an available time slot for any date. -
The patient allocated to the appointment must be registered in QuickDocs. You can use the
listpatcommand to search for existing patients to be allocated the new appointment.
-
-
Test case 1:
addapp r/EXISTING_NRIC d/2019-10-23 s/16:00 e/17:00 c/Weekly checkup
Expected: A message to indicate that the appointment was successfully added will be shown on the main display, together with the appointment details. A reminder for this appointment will also be created and you can see it in the reminder sidebar on the right, if the date of the appointment is in the current week. -
Test case 2: After test case 1, enter
addapp r/EXISTING_NRIC d/2019-10-23 s/16:30 e/17:30 c/Weekly checkup
Expected: since this new appointment a clash in timing with the appointment added in test case 1, an error message will be shown to indicate this conflict and the appointment will not be added. -
Test case 3:
addapp r/EXISTING_NRIC d/23-10-2019 s/16:00 e/17:00 c/Weekly checkup
Expected: Error message will be shown to alert you that the date is in the wrong format, as the correct format is YYYY-MM-DD. -
Other incorrect
addappcommands to try: date without-between month and day, invalid start and end time (start time must be before end time; appointment must be within office hours of 9am to 6pm), any missing prefixes, any missing parameters.
-
-
Delete an existing appointment
-
Prerequisites: appointment to be deleted must already be added in QuickDocs. You can use
listappcommand to list the existing appointments for a given date. We will assume that the appointment in Test case 1 for adding an appointment has been added. -
Test case 1:
deleteapp d/2019-10-23 s/16:00
Expected: A message to indicate that the appointment was successfully deleted will be shown on the main display. The reminder created for this appointment will also be deleted. If this reminder was displayed on the reminder sidebar, it will be removed. -
Test case 2:
deleteapp d/2030-10-23 s/16:00
Expected: Assuming that there is no appointment on the given date and time, you will be informed through the error message shown. -
Other incorrect
deleteappcommands to try: date without-between month and day, invalid start time (start time must be within office hours of 9am to 6pm), any missing prefixes, any missing parameters.
-
F.6. Querying Statistics
-
Querying the statistics
-
Prerequisites: Your system clock should be synchronised with the current internet time.
-
Test case 1:
stats 012019
Expected: The statistics for the month January 2019 should be listed, regardless if there has been any records added. -
Test case 2:
stats 122018
Expected: An error message will be shown, indicating that the command format is wrong. -
Test case 3:
stats 012019 022019
Expected: The statistics for the range of month January 2019 to February 2019 should be listed, regardless if there has been any records added. -
Test case 4:
stats 012999
Expected: An error message will be shown, indicating that the command format is wrong. -
Other incorrect
statscommands to try: end date before start date, invalid MMYYYY numbers (e.g., 000000, 132019). All these commands should lead to an error message being shown.
-
F.7. Adding a new directory for medicine storage
| The following tests assume the tester starts with an empty storage. |
-
Add a new directory under the root directory
-
Test case 1:
adddirec root NEW_DIRECTORY
Expected: A success message confirming the successful addition will be shown in the main display. A new directory called 'NEW_DIRECTORY' will be added to root directory, which is verifiable vialistmed rootcommand. -
Test case 2:`adddirec root NEW DIRECTORY`
Expected: As the new directory’s name includes a white space which is not allowed, no new directory will be added and an error message will show up. -
Test case 3:`adddirec root\Internal NEW_DIRECTORY`
Expected: As the tester starts with an empty storage, there is no existing directory at root\Internal. No new directory will be added, and an error message will show up saying "No directory is found at the given path." -
Other incorrect
adddireccommands to try: commands with missing new directory name
-
F.8. Adding a medicine into a directory
The following tests assume that root\Internal\General is a valid path, i,e there is already a directory 'General' under directory 'Internal' under root directory.
|
-
Add a new medicine into storage
-
Prerequisites: There is no medicine with the same name as the to-add medicine in the entire storage.
-
Test case 1:
addmed root\Internal\General paracetamol p/2.4 q/40
Expected: A new medicine called 'paracetamol' with initial quantity 40 and price 2.4 will be added under 'Flu' directory. A success message confirming this addition will show in the main display. -
Test case 2:
addmed root\Internal\General paracetamol p/2.4 q/40when there is an existing medicne named 'paracetamol' in the storage.
Expected: The addition will fails, as there already exists a medicine with same name. No change will occur and an error message will show up. -
Test case 3:
addmed root\Internal\General paracetamol p/2.4 q/34.5
Expected: The addition will fail. As the quantity in QuickDocs are in terms of units, no fractional number is allowed in the quantity field. An error message will show up. -
Other incorrect
addmedcommands to try: missing any prefixes, invalid path
-
-
Add an existing medicine into a different directory
-
Prerequisites: There is already an existing medicine called 'paracetamol' somewhere in the storage.
-
Test case 1:
addmed root\Internal\General paracetamol
Expected: A new reference to the same medicine will be added to root\Internal\General. A success message will show in the main display. -
Test case 2:
addmed root\Internal\General paracetamolwhen there is no existing medicine with name 'paracetamol'
Expected: No change will occur. As there is no such existing medicine, an error message will show up. -
Test case 3:
addmed root\Internal\General paracetamolwhen root\Internal\General already contains a reference to paracetamol.
Expected: As the same medicine cannot be placed into the same directory twice, no change will happen. An error message will show up. -
Other incorrect
addmedcommand to try: When there is a subdirectory under the same directory with the same name as the to-add medicine.
-